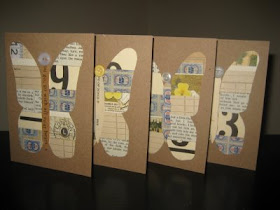
I am all about recycling over on my Greenhab blog, so I am recycling a post today! My apologies -- and promises for a great project next week -- but I've been taking care of a sick little one this week and haven't had much time for other fun projects.
Since I'm approaching my one year anniversary of not buying greeting cards, I thought I'd share this tutorial for making a cute patchwork card.
I made these using plain brown cards from Hobby Lobby and several upcycled pieces of paper - a flashcard, a page from a very old bible I found in the trash at a yard sale, a page of grocery stamps that were used years and years ago, and several other old-timey things. We're going to make a set of 6 cards, so we'll need 6 different pieces of paper.
I decided to make a butterfly for these cards, but you can use any shape you'd like. I simply googled "butterfly clipart", adjusted the size in Photoshop Elements, then traced it onto a piece of paper. Cut our your pattern, then trace it onto the back of the pieces of paper you're using. Cut them out and make sure that they're all the same size.


Stack them on top of each other, then cut up the middle. Hold on to the tightly because they try to move around a bit. Set the right side apart, we'll work with the left wings first.

Now for the tricky part. It's actually easy - just hard to explain. You want a patchwork look, so you'll make your first cut across the top and set that pile down. After that first cut, you're going to "shuffle" the rest of the pieces by putting the top piece on the bottom of the deck. Cut your second strip and set it down. Take the top piece of the remaining deck and put in on the bottom.
Repeat until you have cut the wings into 6 sections.
Then pick up the right wings. Before cutting, put the top piece onto the bottom. Make your first cut and put that pile aside. With the stack still in your hand, take the top piece and put it onto the bottom. Cut your second section, shuffle again. Repeat until you have 6 sections of right wings.
Your piles should now look something like this:

Now it's time to put Humpty Dumpty back together again. I used some glue dots I already had for scrap booking. They're the kind that roll on and they worked beautifully, but a spray adhesive might also be a good choice. Basically you just take the top layer from each pile and glue them onto the card. If your cuts, like mine, were not exactly perfect, then Madame Butterfly might look something like this. Make sure as you're gluing the pieces on the card that the outside edges match up. Don't worry about the middle quite as much because we're going to cover that up. Here's what you'll have now:

Then use some scrap pieces to cut out an oblong body for the butterfly. I also glued a little button head on her because I think everything is cuter with buttons!

~*Kellie blogs regularly at Greenhab: The Browns Go Green*~

Love them! We'll have to make some of these. My 4 year old daughter loves to decorate her room according to the seasons. We are just taking down our Winter Wonderland (icecylces, snowflakes, vintage tussie mussies...) and now we are decorating for spring. We have egg lights strung up and I think these butterflies would look cute adorning her walls. I'll post pics on my blog after we are finished decorating. Thanks for the inspiration.
ReplyDeleteBrenda : )
Hi Kellie,
ReplyDeleteWhat a great card - hope I get one from you!!!
This sort of "altered art" is great in an enlarged version, for your walls. Matted and framed or strung on a display wire, it's beautiful and is showing up in the Merchandise Mart as a product for retail stores.
Mom P.
This is a great post! (Even if it is recycled.) Hope your little one is feeling better!
ReplyDeleteBeautiful project!
ReplyDeleteReally clever idea! I'm excited! What a creative alternative to store bought, but simple enough for those of us who are scrapbook challenged! Thanks for sharing.
ReplyDelete