
First time pickling green beans, over here. I think it went well...I guess we'll find out in a few months! My in laws are on vacation and told me I could harvest in the garden. I'd wanted to try simple green bean canning and since my beans are coming to an end, I'm jumping at the chance to pick some of their green beans!
Are you pickling/canning/putting anything up this year?
Spicy Pickled Green Beans
Food.com
Makes 4 pints
3 pounds green beans
4 long thin red chilies (use gloves when handling!)
3 large garlic cloves
1 tablespoon peppercorns
1/4 cup fresh dill
2 1/2 cups water
2 1/2 cups white vinegar
1/4 cup salt
Trim and remove string from green beans. Cut to fit into jars. Prepare jars, rings and lids for canning.
Bring water, vinegar and salt to the boil.
Fill each jar with beans until they are snug. Insert chilies and garlic. Divide peppercorns amongst jars. Divide dill amongst jars. Ladle the boiled pickling liquid into the jars leaving headspace. Wipe rims of jars, apply lid and screw on rings. Process in boiling water bath for 12 minutes.
Remove carefully and allow to cool to room temperature. During this cooling time, you'll hear quiet pops letting you know your jars have sealed. If by the next day, some of the jars haven't sealed, you can store in refrigerator to be eaten as soon as possible. Allow the sealed jars to sit at least one month in a cool, dark place before opening.
Friday, August 27, 2010
Spicy Pickled Green Beans
Monday, August 2, 2010
Quickie Summer Fun Crafts
With the summer coming to an end you might be running low on some boredom busters. We’ve still got another month of summer before we head back to the classroom in September so I’m looking for as many ideas as possible!
The one activity I truly love is J’s summer community program he’s joins through the school. It’s a free and voluntary program managed by a small group of school officials and volunteers. The kids are dropped off at the local school for three hours twice a week to socialize, play, go on field trips, and do other fun things. They supply the kids with a snack while they go over character enhancing lessons like sharing, manners, eating well, etc. J really enjoys the time with his friends without mom hovering and I enjoy the quiet time here after a week of frantic summer activities.
Here’s a couple of projects J’s done this year at his summer community program you might enjoy.
Treasure Hunt (Two versions of this game)
Version 1
Grab an empty bottle, any size will do, and a few odds ‘n ends that will fit into the top opening pretty easily (hook free fishing lures, craft pom poms, sequins, rubber bands, foam pieces, small toys, even coins). Fill you bottle 3/4 of the way with sand, dry beans, rice, bird seed, anything on hand you have that’s cheap to buy or replace! Add your goodies, cap it and give a good shake. Challenge the kiddos to finding a all the treasure pieces. Make a game of it by seeing who can find them all the quickest.
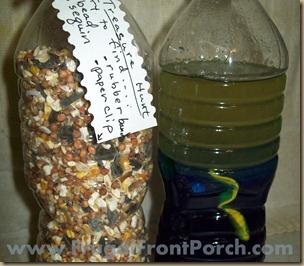
Version 2
Grab another empty bottle, food coloring, some oil (any cheap clear oil will work), and more water proof goodies. Fill the bottle a little more than half way with water. Add food coloring of your choice and swirl it to evenly mix it. Add your water proof trinkets like plastic toys, sequins, rubber bands, etc. Top off with oil, cap and shake.
Make Your Own Chia Pet
Grab a plastic cup, grass seed, potting soil, markers, and an old pair of panty hose. Use the markers to decorate the plastic cup as desired and set aside. Cut the legs off the panty hose about 4” to 6” from the toe. Drop in your grass seed then pack in the potting soil. Tie off the end of the panty hose. Dunk the soil filled panty hose in water until the potting soil is thoroughly moistened. Place some water in the cup and put the panty hose ball (seed side up) on top of the cup and watch the grass grow. As long as the pantyhose touches the water in the cup, it will draw the liquid into the soil.
What are you guys doing to keep the summer boredom blues at bay?
Jenn is a stay at home southern mom raising her kids in Northwestern Minnesota with her trucker hubby. She loves to cook, craft and blog. Soon she’ll be going back to school for a new adventure in Graphic Design. You can find recipes, crafts, parenting strategies, budget tips, product reviews and fabulous giveaways on her blog, Frugal Front Porch.
Friday, July 16, 2010
Friendship Bracelets

So, how's summer going for you? Kids bored yet? Watching a lot of TV and hearing a lot of "There's nothing to doooo!"? I actually don't know what that's like - yet. Thankfully. I'm hoping that I'll be one of those 'cool Moms' that always has a cool game idea or a fun thing to do up my sleeve. Or a craft. Hopefully.
Like friendship bracelets!
Ok I'll admit it. When I saw the picture of these friendship bracelets in the latest Parents magazine, I never intended to post about them. I just remember making them when I was a kid and wanted to make them again. For myself. Oy vey.
You'll want to make them too, whether it's with the kids or without. I made two of them, lickety-split, earlier this week. And then I made four more including an anklet. I'm certifiably insane. My husband is even wearing one - and admitted to me last night that he likes it, and has been asked about it by all of his male coworkers. Because they like it too.
Supplies needed are three different colors of embroidery floss and a bit of tape.
Cut about a two foot long piece of each string and tie them together with a basic knot at one end; leave a bit of a 'tail' so you'll be able to tie the two ends together later. Tape the 'tail' to a surface (table, desk, etc).
Take one of the strings and knot it around the other two. Repeat nine more times and then switch to the second and then third colors, making ten knots with each. You may need to twirl the whole thing occasionally to keep the knots flowing in a tidy curve.
Continue until the bracelet is long enough for the wrist it's going on, knot the end and tie it around the wrist. Trim excess string.
Make sense? I hope so - if not, let me know in the comments and I'll take step by step pictures. It took me a few tries before the bracelet making skills of my youth came back to me, heehee.
Happy summer!!
