
Thursday, April 30, 2009
Oh Oh It's Magic

Tuesday, April 28, 2009
Carnival #113
It is spring, and time to throw up the windows, air out the house, and do a little spring cleaning. Check out these great ideas for frugal cleaning products.
Eating for Less

Many of us are looking for ways to trim our budgets. Here are some ideas for cheap cooking, and to use up what we have. Waste not. Want not.
Indulge your sweet tooth.
More from the Kitchen
Find even more delicious recipes, and some healthy cooking ideas.
100 Awesome YouTube Videos for a Healthier Kitchen
Top 10 Lower Cholesterol Foods
Made Your Own Curry Flavored Rice Mix
How to make Spaghetti Bolognaise: recipe
From the Omalos Plateau: Cretan Rusk Salad
Penne with Spinach and Ricotta
Scrambled Eggs Benedict Florentine
How to Build a Raised Garden Bed
Upcycle Plastic Bags into a Water Bottle Holder
Thank you for joining us for this week's Make it from Scratch carnival. We greatly appreciate your links and social bookmarks to the carnival.
Want to participate in the carnival? Next week the carnival will be hosted at Lighter Side. Submit your posts via Blog Carnival.
Monday, April 27, 2009
Monday's New Face

At least until we moved to Hallock Minnesota early last year. There's a population of nearly 1,500. NO Walmart. NOTHING is open 24/7. ZERO coffee shops. Everything's closed on Sunday except the grocery store and gas station! PLUS we have some of the country's harshest winter weather with subzero temps six months out of the year. Talk about an adjustment! ;) My daily and weekly trips to the stores are reduced to monthly trips and the fast food has nearly been cut from our diet (not hard since there's only ONE restaurant in town!) We make due with what's on hand and buy only what we need at the local grocery store in between trips. This has led me to live a more handmade lifestyle. The simplicity of our new lifestyle has done wonders for my marriage, character, and my new philosophy in raising my kids. I am truly blessed and hope to share some of what I learn with you here every Monday.
This past week has been a little slow when it comes to making anything from scratch. I've been sick with strep throat so I piled up on the couch for most of the week. (I was such a smarty pants thinking it would pass; I miserably waited till Thursday to go to the doctor. For Future Reference-seek immediate doctor's care when experiencing difficulty eating and drinking combined with fever and chills!). If it's been a while since you've been sick-TRUST ME-your kids are telling the truth when they tell you how crappy they're feeling! Thankfully, I'm MUCH MUCH better now and will be making who knows what this week! I will leave you with this little crafty idea I came up with after our Christmas Kitty arrived.
I love to cook and create with just about any medium so there's no telling what new things I'll be writing but you can bet it will be lots of fun. I also write at the Frugal Front Porch if you'd like to read more about me and the other things I'm working on!
Sunday, April 26, 2009
1, 12, 16, 113
Saturday, April 25, 2009
Homemade Bubble Solution Recipe
In our house, a favorite outdoor game is blowing bubbles. When all else fails, bubbles always gets the thumbs-up! This means that we go through bubble solution FAST! It is really inexpensive to make yourself and the kids will think you're a genius!
HOMEMADE BUBBLE SOLUTION
1/2 Cup concentrated liquid dishwashing detergent
6 Cups water
2 teaspoons glycerine (found in the pharmacy near the lotions)
Mix all together and enjoy!!!
Friday, April 24, 2009
Create a Flower Pot from a Log
It is funny when ideas strike you. I get some of my best ideas while doing simple repetitive tasks, like washing dishes or hanging clothes on the line. This particular idea came when I was stacking a wood pile. Not only was it a mindless task that gave me the time to think about other things, I was inspired by the one of the objects of the task.
When we moved here trees had to be cleared for the houses and for the electric lines. Now, we have a lot of cut wood around. Much of it is nice fire wood, but some of the logs are rotten and look like this.

As I was stacking the nice wood, and debating throwing the bad wood on the camp fire pile, I had my idea. Wouldn't these rotten pieces of wood make lovely planters for the porch? Today I found out.
I chose three rotten logs that would sit well, and that were interesting. One of them was rotted through all the way, one almost all the way, and the other about half way. For the first two, I wadded up some plastic grocery bags as a filler. The idea is to make the pot lighter, create drainage and use less soil. I've read about people using water bottles as filler. I didn't have any. Since I haven't learned to do all the neat things Cindy does with plastic bags, I figured this was a pretty good use for them.
Then I added a few scoops of dirt. (My scoop was an old sour cream container.) Then added the plants. I splurged on $3 of annuals at the store the other day. In the pot I put two New Guinea Inpatients, an alyssum, and a wave petunia. Then I added a couple more scoops of dirt around the plants, and watered.

I must say I was very happy with the result, and even happier that each of these only cost me a dollar (for the flowers) and some change (for the potting soil.)

How's that for a frugal flower pot? Now, if I'd just started the flowers from seed, and had compost ready for soil, these lovelies would have practically been free! Maybe next year! :)
Thursday, April 23, 2009
Czech for Lunch


Tuesday, April 21, 2009
Carnival #112
Saturday, April 18, 2009
Homemade Carpet Refresher
Many of us are in the middle of our annual Spring cleaning- opening the windows, flinging the clutter and getting rid of the winter dust and blah. Ahhhh! Feels great, doesn't it?
One of the things I do annually is use a carpet refresher to give a cleaner scent to the house. There are several brands available in the stores, but making your own is so very easy and cheap! This can also be given as gifts when put in a pint canning jar topped with a pretty bow or hand made tag.
Homemade Carpet Refresher
1 part Borax
1 part Cornstarch
1 part Washing or Baking Soda
Essential oil in any scent you prefer (I like apple myself)
Mix the dry ingredients first in a well-ventilated area. (You might even consider wearing a fresh-air mask while mixing powdered ingredients.) Add a few drops of your favorite essential oil- which can often be purchased behind the pharmacy counter or with candle-making supplies. Gently stir the mixture until the oil is well incorporated.
TIPS- for a small amount, try using one cup of each dry ingredient and about 6 drops of oil.
Thursday, April 16, 2009
Stenciled Travel Bags


Using Leftover Easter Eggs
Tuesday, April 14, 2009
Carnival #111
Saturday, April 11, 2009
Homemade Chicken Pot Pie

My answer is, "Post a recipe!". Ha ha!!! Take that, sewing machine!!!
HOMEMADE CHICKEN POT PIE
Pie dough (enough for two 2-crust pies)
1 bag Frozen Mixed Veggies (Mine had peas, carrots, Lima beans, green beans and corn)
2 cans Cream of Chicken Soup
1 to 1.5 Lbs. Cooked Chicken
Salt and Pepper to taste
5 Mini pie tins

-Heat oven to 375 degrees.
-Divide pie dough into 10 even-sized balls. Roll one ball out and press into one mini pie tin. Repeat with four more dough balls until all the pie tins are lined with dough.
-Cube cooked chicken (leftover chicken works well for this) and place into large mixing bowl.

-Combine the frozen veggies, cream of chicken soup and salt and pepper with the chicken until well mixed. (At this point, you could heat this mixture on the stove top to save on the baking time a little, but that is up to you. Just be sure to watch the pies in the oven closely so they don't burn.) Pour or spoon chicken mixture into mini pie tins.
-Roll out remaining dough balls, one at a time, and place each over the top of the filled pie tins.

-Press a fork into the edges of the dough to seal them. With a sharp knife, cut steam vents into the top of the pie dough near the center.
-Place pies onto a large baking sheet with sides (to catch any filling that might leak out during cooking) and place in oven.
-Bake about 30 to 40 minutes until tops are golden brown and filling has reached an internal temperature of at least 165 degrees.
-Remove from oven and allow to cool about 10 minutes before serving.
councilwoman and babysitter from Ohio.
She also blogs at Heather LessiterIts All for the Best
and The Fat Bottomed Girl.
Friday, April 10, 2009
Healthy Whole Wheat Banana Bread
1/2 cup honey
1 teaspoon vanilla extract
2 eggs
1 cup mashed bananas
1 3/4 cups whole wheat flour
1/2 teaspoon salt
1 teaspoon baking soda
1/4 cup orange juice
2 tablespoons water
Thursday, April 9, 2009
Crab Stuffed Shrimp

Stuffing:
¼ pound Butter
¼ pound Diced Onion
¼ pound Diced Celery
1 ½ tsp. Chopped Garlic
2 Tbs. Sliced Green Onions
¼ tsp. Salt
1/8 tsp. Black Pepper
1/8 tsp. White Pepper
1 cup Bread Crumbs
¼ pound Lump Crab Meat
Place sauté pan over medium heat. Place butter in the pan and allow to melt.
Place onions, celery, garlic, green onions, and seasonings in pan and cook for 6-8 minutes.
Place mixture into a blender and blend for 20 seconds. Caution: Mixture will be HOT.
Transfer mixture to a mixing bowl adding bread crumbs and drained crab meat. Fold in with a spatula until blended.
Lemon Pepper Butter:
½ cup Water
2 Tbs. Flour
1 ½ Tbs. Lemon Juice
½ pound Butter
1 tsp. Lemon Pepper Spice
Combine water, lemon juice, flour and seasonings in a sauce pan.
Over high flame, whisk until mixture thickens. Remove from heat.
Slowly add softened butter in small amounts until all is blended.
Cooking Shrimp:
Butterfly shrimp.
Place flour in a container and toss shrimp until completely coated.
Deep fry shrimp at 350 degrees for 1 1/2 minutes.
Place 1 Tbs. of hot stuffing onto each cooked shrimp.
Drizzle 1 Tbs. of Lemon Pepper Butter over each shrimp.
Serve and Enjoy!!!!!
Thanks Outback for the wonderful recipe!
Tuesday, April 7, 2009
Carnival #110
Saturday, April 4, 2009
Beaded Eggs

My only problem with this is that I am practically out of glitter after Christmas. I did manage to get to the store, but I stayed away from the glitter since I knew I had some seed beads left from a fall project in my craft supplies. I just knew they would work! The bonus is that I saved the money I would have spent on new glitter, saved quite a glittery mess (since the kids were helping) and I used something I already had on hand. Woo hoo!
More bonuses: Using a syringe, you can save the egg whites and yolks to make scrambled eggs or for baking; these eggs can be kept for YEARS!
MATERIALS NEEDED:
Eggs
Pin or other tool (I used my tiny screwdriver set)
Syringe or aspirator (optional)
White Glue
Seed beads or glitter
Step 1: Using your pin or tool, poke a small hole in the top of your egg. Poke a slightly larger hole in the bottom of the egg. Poke inside the bottom hole to break the yolk. This helps it to come out easier.
Step 2: If you don't have a syringe (I used a large one from an ink cartridge refill kit), place your mouth over the top hole and blow into it. The insides should start coming out of the bottom. If not, you may need to make the bottom hole larger. Rinse your egg and allow to dry on a towel.
Step 3: Coat your egg with white glue (I used tacky glue) and then coat with beads. I found that it is better to work in small sections- about 1/3 of the egg- and let each section dry a bit before continuing. You will also want to push the beads closer together and push them into the glue for better coverage.
Matthew wanted to make an Ohio State "O" on one egg, so we (meaning I) painted the glue in an "O" shape and put on the red beads. We let it dry about 15 minutes before continuing with the white beads. It is now my favorite egg we made that day.
school cafeteria worker,
councilwoman and babysitter from Ohio.
She also blogs at Heather LessiterIts All for the Best
and The Fat Bottomed Girl.
Friday, April 3, 2009
Homemade Granola
Let cool. Store in an air tight container. Enjoy!
(I love the heavenly glow above the granola in that photo!)
Thursday, April 2, 2009
Natural Dye for Eggs

Another option is to make and strain the dye, and then to cook the eggs by boiling them in the dye. Or you can make the eggs and the dye at the same time by boiling the eggs and the dying material together. For either of these options, the color can be made deeper by keeping the eggs in the dye longer if the color is not quite right by the end of the egg cooking time. Again, you will want to refrigerate if a longer soak is desired.
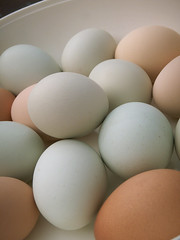
The eggs in the photo above were made by boiling the eggs and dye separately. They were soaked overnight in the refrigerator. What made those beautiful colors? The eggs on the top left were dyed in the coffee left over from my morning pot. The three on the right in the top row were dyed in a very weak carrot dye made from the peels and ends of carrots I used for dinner. The three orange/red ones in the middle row were dyed in dye made from the skins of yellow onions (also scraps from our dinner.) The pink eggs soaked in pickled beet juice. And the beautiful blue and brown speckled eggs on the bottom were created using a secret only known to my hens. Those truly are naturally dyed eggs.
Creating your own dyes for Easter eggs can be fun and educational. Experiment with different items you have on hand to create a wide range of beautiful colors. You may find some surprises when items you expected to be one color actually create a dye of another color. Enjoy the process.
Wednesday, April 1, 2009
Firsts on the First - Ham and Potatoes Au Gratin
