Wednesday, November 12, 2008

Vote for Make it From Scratch!

Join Us at the HSBA!


Thank you to those who nominated us for the Best Variety category! The voting has begun and will continue until November 21. Would you take a moment to pop over there and vote for us?  Thanks!

Tuesday, November 11, 2008

Carnival # 89

A little late, but well worth the wait, this week's carnival is at The Daily Dish. I feel like I say this every week, but there are so many great submissions this week. Well, even if I do say it every week, it is true! We have a very talented and creative group of bloggers participating in this carnival. Every week I'm impressed and inspired. Thanks to all of you!

A few favorites this week:

Candy Cane Hearts
This is such an adorable craft. The best thing is even a craft challenged mom, like myself, could make these with her kids!

Frugal Gift For Frugal People
Cute, easy and something any frugal shopper would appreciate.

Chainmail Bracelet
WOW! Way beyond me, but WOW!

What no recipes in my favorites?! Unusual I know. There are plenty of good ones over at the carnival. So, go see them and enjoy!

Next week the carnival is right here with an optional Thanksgiving theme. Give me your best Thanksgiving crafts, sewing, cooking, or other projects! Use the blog carnival form to submit your post.

Would you like to host the carnival? We can always use a few more people on the schedule! Just email me!

Saturday, November 8, 2008

Mitten Gift Bag/Decoration


These oh-so-cute mittens are so versatile and easy to whip up, you'll want to make them by the dozen! They can be used for so many things: a mini gift bag for cash or gift cards, a package add-on, a decoration to hang on the wall or on a door knob or a tree ornament. They also fit into the "all winter long" category which means you can leave them hanging for a splash of color after you've taken down all of the Christmas decorations!

These would also be nice to embellish with felt stars, sprigs of faux greenery, jingle bells, bows or smaller snowman ornaments.

Materials needed:
Fabric (I used some from an old flannel shirt and some scrap fleece)
Sewing machine or needle and thread
Craft wire, ribbon or twine
Scissors
Unsharpened pencil or chopstick
Embellishments (optional)


Step 1: Begin by making a pattern or using one like this one I found online.


Step 2: Cut the pattern out and cut two mitten shapes from the fabric. Stitch all the way around the edge with a 1/4 inch seam allowance leaving the bottom open.


Step 3: Clip the seams on the curves and trim the seam allowance to keep the fabric from puckering when turned right-side out.

Step 4: Turn the mitten right-side out using a chopstick or unsharpened pencil to help push the seams out all the way.

Step 5: Cut about 12 inches of craft wire. For a decorative touch, create a coil in the center of the wire by wrapping it around a pencil several times, then stretching the coil out a bit.


Step 6: Poke each end of the wire through one seam at the opening of the mitten. Bend the wire and twist to secure it.


Heather is a wife, mom, school cafeteria worker,
councilwoman and babysitter from Ohio.
She also blogs at
Its All for the Best
and
The Fat Bottomed Girl.


Thursday, November 6, 2008

Make it from Scratch Thanksgiving - Talking Turkey

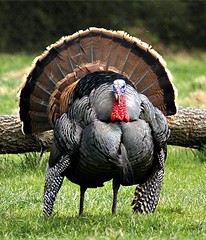
Thanksgiving is a mere three weeks away, and it is time to talk about the star of the show, the turkey. Did I hear squeals of delight? Obviously, you have partaken in Thanksgiving turkey done right, a moist and flavor full bird. 


Or was that groans of dread I heard at the thought of dry meat being choked down with a bunch of gravy? In a quest to make sure the turkey is really done, many cooks roast the bird until it is dry as cardboard. If that has been your experience, let me share some tips for roasting a turkey to perfection. 

What to Buy
Fresh or frozen? Tom or hen? Which brand? It really doesn't matter. Really. That is my experience. And an article in this month's Debt-Proof Living confirms it. The article was written by a former butcher, John Smith, author of Confession of a Butcher.

He  said a frozen turkey is actually fresher than a fresh turkey. He claimed that the quick freezing of the frozen turkey keeps the meat fresher than a "fresh" turkey that is kept almost at the freezing point, but never quite frozen. So, "fresh" is not as fresh as frozen. Frozen is fresher than "fresh." Confused? Just buy the frozen bird. 

Hen or tom? They are labeled by the weight of the bird, not the actual sex of it. Your tom may actually just be a large hen. Or your hen a small tom. The point? Buying a turkey by its sex is pointless. 

Brand? Often they are the same birds in different packaging. Buy what is the cheapest. 

You will want to figure roughly one pound per person when determining the size of bird. Of course if you want a lot of leftovers to freeze and use later, buy a bigger bird. Once you've decided what size bird you need, look for the roundest, plumpest one in that size. 

Bottom Line: Buy the cheapest roundest bird in the size you need.

Now that You Have Your Bird
Keep it cold. It is best defrosted in the refrigerator. It takes about 1 day for each 6 pounds to defrost in the refrigerator. Leave it in the original wrapping, but you will want to place a pan under the bird to catch any dripping. 

Timing is Everything
The biggest stress of pulling off the Thanksgiving dinner is the timing. I will talk more about that with in regards to the whole meal next week, but for today, let's concentrate on timing the bird. Decide when you want to eat and then count backwards to find when the turkey needs to be in the oven. From serving time count back one hour to allow time for carving and to let the turkey rest 20 minutes after it comes out of the oven. Then count back the actual roasting time to find time you need to start the bird. 

Estimated roasting times at 325 degrees F.
6- 8 pounds 3-31/2 hours
8-12 pounds 3 1/2- 4 1/2 hours
12-16 pounds 4 1/2- 5 hours

So, if you want to eat at noon and have a ten pound bird, you need to start roasting the turkey at 7:00 AM. That is figuring one hour for resting and carving and four hours for roasting. 

Preparing Your Turkey
Remove the giblets to use for the dressing. Rinse the bird inside and out. 

Do not stuff with the dressing.  The bread in stuffing absorbs the fat and moisture of the bird, drying out the meat without adding much flavor. Instead, fill the cavity with items that will add moisture and flavor. Onions and celery are my favorites. Apples and carrots are good also. 

Place the turkey in a shallow roasting pan, breast side up. Rub olive oil over the skin and season. Seasoning can be as simple as salt and pepper, or you can use other seasonings you enjoy. I like ginger, garlic, and rosemary.

Loosely cover the turkey with foil.

Your turkey prep will probably take about 30-45 minutes. 

Now You're Cooking
Once the turkey is in the oven, there isn't much else to do with the bird. If you've rubbed oil on it and tented it with foil, there is no need to baste. Just wait until the bird has roasted for about 2/3 of the anticipated time. At this point, you want to start checking the meat so that it does not overcook. Check with a meat thermometer inserted in the thickest part of the drumstick, without touching bone. The turkey is done when it reaches 165 degrees F. The foil needs to be removed for the last half hour of cooking to give the turkey a nice golden color.
 
One more suggestion about roasting the turkey. Oven space is at a premium Thanksgiving day. If you have a large roaster oven, it is a great place for the turkey. One caution though, the bird cooks much faster in the roaster than in the oven. The first year we used a roaster we were shocked when the bird was done almost an hour early. We were able to keep the bird warm and moist while we hurried along the other dishes, but it was a little stressful. 

Practice Makes Perfect
Turkey is cheap this time of year. If you are a little anxious about roasting a moist delicious bird for the big day, why not give it a practice run? There is plenty of time, and you will feel much more confident when the big day comes. 

More Made from Scratch Thanksgiving posts:

Tuesday, November 4, 2008

Make it from Scratch #88

This week the carnival can be found at A bit of flour. Enjoy this weeks recipes, crafts and more. Here are a few that I found particularly interesting this week. 


No idea what this is? I didn't either until I read the post. Let's just say garlic, chili peppers, chili powder and cilantro....that is my kind of soup.

I've been looking for ideas to use tomatoes I dried this summer. This looks like a winner!
What a special gift for a first anniversary.

Saturday, November 1, 2008

Make a Simple Fleece Scarf in Minutes!

Fleece is one of the greatest fabrics to work with. It is very forgiving, doesn't need hemmed and results in soft, cuddly creations. Fleece also comes in so many great colors and designs to choose from that it makes it easy to customize your projects to the recipient's likes.

One of my favorite things to do with fleece is make a fleece scarf. Homemade fleece scarves are a quick and easy gift idea for any occasion. Just a couple of yards of fleece, a pair of scissors and 30 minutes and you'll be able to cross off several names from your gift list and come in WAY under budget! One of my son's teachers made fleece scarves for her entire class and they were a huge hit with the kids!

Materials needed:
60 inch wide fleece (sometimes called polar fleece)
Scissors

Step 1: Start by laying your fabric out just as it came off the bolt- folded so it is 30 inches wide from the fold to the open side. It isn't necessary, but you can now cut off the finished edge if you prefer (it usually looks like it is folded up and pressed).

Step 2: Measure along the folded edge and make a small cut (you can also mark it with a marking pencil instead of cutting) every 6 inches (you'll get about 6 from each yard this way). Repeat on the open side so the cuts or marks will line up with each other.

Step 3: Cut a straight line from the mark on the folded side to the mark on the open side to make one long strip that is 6 inches wide.

Step 4: To make fringe on the ends of your scarf, make 5 cuts about 1.25 inches apart and about 4 inches long into each end.

Your handmade fleece scarf is complete! If you keep fleece on hand, you can crank out a scarf as a last minute gift or make several when you have a little time on your hands.


Heather is a wife, mom, school cafeteria worker,
councilwoman and babysitter from Ohio.
She also blogs at Its All for the Best
and The Fat Bottomed Girl.


Thursday, October 30, 2008

Make it From Scratch Thanksgiving - Potatoes and Sides

The past few weeks I've been sharing recipes and tips to create a made from scratch Thanksgiving. We've talked about rolls, pumpkin pie, stuffing and cranberry sauce. This week it is potatoes and other sides. Next week will feature the star of Thanksgiving, the turkey. On November 13, I will share a few tips about timing and putting it all together. 


Then, on November 18 the Make it from Scratch carnival will be hosted here. The theme is Thanksgiving. I am asking you to submit your favorite Thanksgiving recipes, tips, crafts, and other ideas for a memorable holiday. I can't wait to see all your ideas, but for now, on to potatoes and sides. 

As you may remember, I hate to peel potatoes, but even I make mashed potatoes from scratch for turkey day. Often I find someone else to peel the potatoes for me, but that is beside the point. What is there to say about mashed potatoes? Peel, boil, mash, and add butter, milk and salt to taste. One trick to make sure your potatoes stay hot is to warm the milk and melt the butter before adding to the potatoes. 

There are a lot of ways to dress up your mashed potatoes. You can add a little garlic, some sour cream, parsley, cheese, bacon bits or a little bit of all of that. I'm just as happy with plain mashed potatoes, and good turkey gravy. 

Um...good....turkey...gravy... again a weakness exposed. I am not a good gravy maker. Probably because I don't practice enough. A few weeks back, A bit of flour shared The secret of fabulous turkey gravy. Perhaps there is hope for me yet. 

That brings us to the other potato staple for Thanksgiving, the sweet potato. I know that tradition holds that sweet potatoes at Thanksgiving are supposed to be sweet and sticky with lots of sugar and marshmallows on top. I'm sorry, but YUCK! I know some of you love that dish, but I love sweet potatoes and I like to taste them. 

My favorite way to serve sweet potatoes is to simply bake them. Whip together some butter and cinnamon to serve with them, and I'm in sweet potatoes heaven. Baked sweet potatoes are easier, healthier, and tastier than that other popular sweet potatoe dish!

Do we need more sides? Well of course we do, it is Thanksgiving. The more the merrier! Usually I serve a simple vegetable side like green beans, corn or a simple salad. Another favorite is green bean casserole.

You might notice that the potatoes and sides really are not the highlight of the meal for me. I do enjoy them all, but the rolls, stuffing and turkey are where it is at for me. When preparing the meal, I spend a lot of time on those and keep the other dishes on the simple side. 

Next week we'll talk turkey. 

Header designed by Crystal. Thanks!