Showing posts with label desserts. Show all posts

Monday, August 23, 2010

Espresso Chocolate Jam Birthday Cupcakes

Hubby’s birthday was last week! Sadly he was on the road an unable to be here on his big day but we celebrated over the past weekend. Hubby loves peanut butter cups. Something about the combination of chocolate and peanut butter puts him in a heavenly place. For the past several years I’ve tried to incorporate his love of peanut butter and chocolate into his birthday cake. Last year’s attempt was very good but the cake was so heavy and rich. I had to swig down a whole glass of milk to cut the richness of just a small slice. Maybe it was a little too rich! This year I wanted a lighter airier version!

Espresso Chocolate Jam Cupcakes w/Whipped Cream Cheese Frosting

Time with hubby is precious since we only spend a few days together every two weeks so I cheated! I used a box mix and store bought frosting to jump start the baking process but I added my own twist. You can easily use a few of my tricks to add a little extra umph to your baked goodies regardless if you use store bought mix or if you make it from scratch!

  • Duncan Hines Dark Chocolate cake mix
  • Betty Crocker Whipped Cream Cheese frosting
  • Strawberry jam or preserves

Prepare cupcakes per package directions EXCEPT substitute water for super concentrated brewed coffee (cooled) or simply dissolve 2 tablespoons of instant coffee into the water. All the cupcakes to cool completely!

Using a knife or small circular cookie cutter, cut a circle shape in the top of the cupcakes. Using a fork, gently insert into the side of a circle and pop out the middle section of the cupcake and set aside. Drop at least a teaspoon of jam or preserves in the middle of each cupcake replacing the the cupcake centers on top of the jam.

Pipe whipped cream cheese frosting on top allow to set and serve. You can also mix 1 part of creamy peanut butter with 2 or 3 parts whipped cream cheese frosting and pipe onto cupcakes. (Tip: I used a simple plastic sandwich bag with the corner snipped off to pipe the frosting.)

Espresso Chocolate Cupcakes with a suprise inside peanut butter frosting + jam centers taste like a chocolate PB&J

The coffee flavor offers a nice subtle complimentary flavor to the chocolate cake. Of course, if you wanted a stronger coffee taste to the cake, you can always make the coffee stronger before adding it to your cake mix. Ultimately, the cupcakes were a hit. I made several with jam filled centers, some with just plain cream cheese frosting, and others with a peanut butter cream cheese frosting. This is on the “definitely to repeat” list!

frugal front porchJenn is a stay at home southern mom raising her kids in Northwestern Minnesota with her trucker hubby. She loves to cook, craft and blog. Soon she’ll be going back to school for a new adventure in Graphic Design. You can find recipes, crafts, parenting strategies, budget tips, product reviews and fabulous giveaways on her blog, Frugal Front Porch.

Monday, August 16, 2010

Easy Apple Raisin Crisp

I’m going to be honest, I stole tried this recipe from Food Network’s Sunny Anderson when I had the four fellas here this summer. We had an abundance of apples and this made for a fantastically easy and fast dessert! Just about any firm apple works even though she recommends Fuji or McIntosh apples. The kids loved (LOVED) ‘em and i can’t believe it was so simple to make.

Apple Raisin CrispI wonder if it would be too indulgent to enjoy for breakfast one day???

Ingredients

  • 2 apples (recommended: Fuji or McIntosh)
  • 1 teaspoon lemon juice
  • 1/4 cup strawberry jam, jelly or preserves
  • 2 tablespoon all-purpose flour
  • 3 tablespoons butter, cold and diced
  • 3 tablespoons brown sugar
  • 1/2 cup oats, uncooked
  • 1/4 cup raisins
  • 1/2 teaspoon ground cinnamon
  • 1/4 teaspoon ground allspice
  • 1/4 teaspoon ground nutmeg
  • Pinch salt

Directions

Preheat oven to 350 degrees F.

Cut each apple in half along its equator. Using a melon baller or spoon, cut out the core, creating a rounded hole. Rub apple with lemon juice to prevent browning. Place 1 tablespoon of jam into each hole and top with a few raisins.

Topping: in a small bowl mix together dry ingredients plus the cold butter. It’s faster and easier if you do this with your hands. Press the mixture on the top of each apple. Be careful not to press too hard or the jam will squirt out. Place in a baking dish filled with about a 1/4-inch of water. Bake until top is golden brown and apple is tender, about 35 to 40 minutes.

Here is a link to Sunny’s original baked apple recipe.

006

frugal front porchJenn is a stay at home southern mom raising her kids in Northwestern Minnesota with her trucker hubby. You can find recipes, crafts, parenting strategies, budget tips, product reviews and fabulous giveaways on her blog, Frugal Front Porch.

*Be sure to check out how you can win a $25 Sam’s Club Gift card – it ends Wednesday!

Friday, July 2, 2010

Homemade Oreos


Remember two weeks ago, when I mentioned my camera had broken? Well, it's still broken. My Mom has been letting me borrow hers but unfortunately, she's had to take it back this week through the weekend - they're headed off for an overnight stay and she wanted to be able to take pictures!

Unfortunately there won't be any pictures of my efforts for today's post - I'm hoping there will be some cookies remaining when I can borrow the camera again on Monday - if there are, I'll be sure to update this post with pictures!

And yes, I said cookies - oreo cookies, to be exact. You know you love them!! I never buy storebought cookies, I feel unbelievably guilty if I do because hey, I can make them, right? But Oreos, oh, Oreos. I love them so. Especially the double stuffed ones - oy vey!! I don't even remember the last time I had an Oreo...

But now! Now, we can make our own!! Jen from Beantown Baker posted about her attempt at them after seeing the recipe from Deb over at Smitten Kitchen. Deb, now she got the recipe from a book called Retro Desserts (PS want!) by a certain Wayne Brachman. Whew!

Our opinions? They're a really great substitute. My only complaint is that the cookie itself was a little too soft. And Oreo has a bit of a snap, you know? After having made these, I find out that Jen gave Oreos a try a second time, and had better luck with that cookie recipe combined with this filling recipe. So maybe I'll take her lead and give that a try next!

So, on to the recipe, shall we??

Homemade Oreos
Retro Desserts
Makes approximately 32 sandwich cookies

for the cookies:
1 1/3 cups Dutch process cocoa powder
1 1/2 cups flour, plus more for dusting
1/4 teaspoon salt
1 cup unsalted butter, softened
2 cups sugar
2 eggs
1 teaspoon vanilla

for the filling:
1/4 cup room temperature, unsalted butter
1/3 cup shortening
2 cups powdered sugar
2 teaspoons vanilla

Cookies
Sift together the cocoa powder, flour and salt in a large bowl.

Using a mixer, cream the butter and sugar. Add eggs one at a time, then vanilla. Add the dry ingredients and mix until just combined, scraping the bottom of the bowl with a spatula.

Divide the dough into 2 pieces. Place one piece between 2 lightly floured pieces of parchment paper and roll into a 1/4 inch thick rectangle. Repeat with other piece of dough. Refrigerate both rectangles, covered with parchment sheets, until firm; at least 1 hour or up to several days.

Using a 2 inch round cookie cutter, cut the dough into 64 circles, rerolling scraps once. Place cookies about 2 inches apart on ungreased baking sheets and chill for 20 minutes. Preheat oven to 325F.

Bake cookies until they are set and slightly darker around the edges, about 20 minutes. Cool completely on wire racks.

Filling
Place butter and shortening in a bowl and at low speed beat in the sugar and vanilla. With mixer on high, beat another 2 to 3 minutes until filling is light and fluffy.

Assembly
Place about a teaspoon's worth of filling into the center of one cookie. Place another equal sized cookie on top of the cream and press lightly so filling reaches edges of cookie. Continue until all cookies are used.


I call Gotta Little Space and Suitable For Consumption home; come say hi!

Monday, May 31, 2010

Fast Mini Memorial Day Desserts!

I hope your enjoying a safe, dry and warm Memorial Day weekend!

We are NOT! It’s safe but it’s not warm or dry!

Saturday started beautifully with sunshine and an unusually warm humid 93 degree day. During our peak July summer time heat, we barely read 90 so this was VERY unusual!

Memorial Day 2010 via FlickrWe took full advantage of the day driving into the great city of Grand Forks for some fine Chinese dining (I say ‘fine’ because we only have one sit down restaurant which isn’t really great!), grocery shopping (you’ll be glad to know I saved 50% on our grocery bill w/coupons and in-store sales!), then back home for an afternoon of graduation parties!

First we saw it! Off in the distance, low dark gnarly looking clouds slowly, VERY slowly moving our way. The humidity is through the roof but it’s still gorgeous and 93.

Then we heard it! The low grumble of an angry storm!

Then we felt it! A SUDDEN drop in temperature along with some high winds. Just like that, the humidity disappeared and the rains came!

Along with lightening, thunder, intermittent satellite signals and sporadic power flickers. Graduation parties were over…ironically except for the die hard adult party goers!

Today I awoke to lots of standing water in the backyard and a high of 63 degrees but thankfully nothing else worse for the wear. Friends of ours to the east were drenched with thunder and lightening storms coupled with golf ball sized hail! HAIL! Thankfully we had no tornadoes in the area! (BTW, tornadoes are EXTREMELY uncommon in this part of the Midwest!) They’re talking more rain tonight but hopefully it will sweep around us.

I think the bad weather rained on my culinary mojo too!

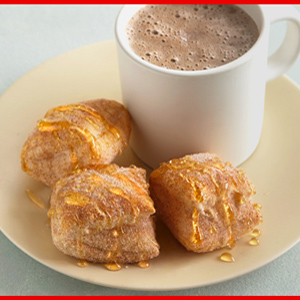
Easy Sopapillas from Pepperidge FarmWe’re attending a BBQ later today and was asked to bring a side dish or dessert plus any alcoholic beverages we’d planned to drink. I had planned on taking a mini dessert of some sort. Something easy to eat while you walk around socializing or chasing kids. Suddenly, my mind went blank! I reached out to my new friends at the Momdot Forum for some inspiration and those ladies quickly came through.

I’m altering my original Cheaty Cheesecake recipe making mini version with a pie pastry instead of graham cracker crust. I also plan to make an American version of the Sopapilla. I’m shortcutting the process a bit by using store bought pie dough and puff pastry but it’s a holiday so forgive me! ;)

Sopapillas are really easy and I’m simply putting a twist on Pepperidge Farm’s recipe. Cut sheets of thawed puff pastry into 2” squares and bake according to package directions till golden. Toss warm pastries with a cinnamon-sugar mixture in a paper bag till thoroughly coated. Instead of honey. I’ll drizzle simple icing made with powdered sugar and milk and topped with a sliced strawberry!

Mini Cheaty Cheesecake Recipe

Ingredients

  • pie dough
  • 1 (8 ounce) brick of cream cheese softened
  • 1 cup of whipped cream plus another cup reserved
  • 1 package of instant pudding (either vanilla or lemon flavored)
  • 1/2 cup sugar
  • 2 tsp of lemon extract
  • fresh berries for topping 

DirectionsThe Original Cheaty Cheesecake

Make mini pie shells. Cut pie pastry into circle large enough to fit inside a muffin tin without any excess sticking out of the top. Score with a fork so it doesn’t bubble while it bakes. Bake at 350 till golden, about 15-20 minutes.

Prepare your filling while mini pie shells are cooking and cooling. Whisk sugar and pudding mix and blend well with softened cream cheese and lemon extract! Fold in 1 cup of whipped cream. Spoon into completely cooled mini pie shells. Top with whole or sliced berries and garnish with a sprig of mint.

*Click to view my original Cheaty Cheesecake Recipe pictured above.

Jenn is a southern girl raising her family with her husband in NW Minnesota. Living on one income doesn’t mean we have to live without! Find coupons, freebies, recipes, parenting strategies, homemaking tips, product reviews, and giveaways at her blog, Frugal Front Porch.

Monday, May 24, 2010

Cool Semi-Homemade Summer Treats – Just in Time for Memorial Day!

Can you tell the difference between these two?

Homemade Ice Cream Sundae Cone Ice Cream Sundae Cone made by Nestle Drumstick

Both have rich vanilla ice cream. Both use a yummy sugar cone. Both have a delicious hard chocolate shell. Both are coated in crunchy peanuts.

Price for the one on the right is $8.73 for 16 at Sam’s.

Price for the one on the left…pennies on the dollar.

Why? The one on the left is homemade! This month’s edition of Food Network’s Magazine features a selection of semi-homemade ice cream truck style recipes. These types of treats can add up…quickly…especially if you purchase them in singles from the ice cream truck, convenience store, or concession stand. Making my own, even a semi-homemade version, will take the crunch out of my wallet this summer.

Start with store bought ice cream, sherbet, or frozen yogurt (or if your really adventurous, make you own). Allow it to soften slightly to make scooping and molding easier. Place a malted milk ball in the bottom of each chilled cone. This helps prevent drippage during consumption! Using store boughtor homemade hard shell chocolate syrup, coat the inside of chilled sugar cones. Allow chocolate to set. Scoop ice cream into each cone. Dip the top in the hard shell syrup and roll in chopped nuts. Place cones in chilled glasses on a baking sheet inside the freezer to allow ice cream to harden, approximately 2 hours. Once ice cream has completely set, place cones in a freezer bag for an ice cream truck style treat anytime!

The Food Network Magazine’s version of the Ice Cream Sundae Cones recipe includes a make it yourself hard shell chocolate sauce I’d like to try for even more savings on our frozen treats.

061I also liked their idea about making marbled orange cream popsicles. They used orange sherbet but any flavor will work, vanilla ice cream,  basic cookie cutters, parchment paper and popsicle sticks. I have a popsicle mold that will make this process much easier. Allow the ice cream to soften, then place alternate small scoops of ice cream/sherbet flavors into your mold. After several scoops, use a spoon or spatula to press the ice cream mixture down into the mold/cookie cutter. Add more alternating scoops of ice cream and press down again until the mold is full and smooth. With a popsicle mold, simply add the stick or top and pop back into the freezer till firm.

The cookie cutter method is a bit different and a bit more involved but produces a variety of shapes that’s certain to be a hit at your Memorial Day party. Cover the cookie cutter filled with ice cream with plastic wrap and freeze for an hour. Then remove the cookie cutter, insert your popsicle stick, smooth the ice cream if necessary then place on a secondary chilled baking sheet lined with parchment paper. Pop it back into the freezer until completely frozen. I’ll stick with my ice cream molds since they wolf them down faster than I can make them!

Ice Cream TacosHere are some links to other ice cream recipe ideas:

I plan to experiment with pureed fruit, fruit juices along some of these tempting ideas. What is your favorite frozen treat?

frugal front porch

Jenn is a SAHM with three kids of her own plus two step kids with her fabulous husband. She writes about her transition from 30 years of big city life in Tennessee to small town living in Northwestern Minnesota. Find recipes, home keeping tips, craft ideas, family strategies, plus giveaways and product reviews that help keep her budget in balance.

Header designed by Crystal. Thanks!