Monday, May 31, 2010

Fast Mini Memorial Day Desserts!

I hope your enjoying a safe, dry and warm Memorial Day weekend!

We are NOT! It’s safe but it’s not warm or dry!

Saturday started beautifully with sunshine and an unusually warm humid 93 degree day. During our peak July summer time heat, we barely read 90 so this was VERY unusual!

Memorial Day 2010 via FlickrWe took full advantage of the day driving into the great city of Grand Forks for some fine Chinese dining (I say ‘fine’ because we only have one sit down restaurant which isn’t really great!), grocery shopping (you’ll be glad to know I saved 50% on our grocery bill w/coupons and in-store sales!), then back home for an afternoon of graduation parties!

First we saw it! Off in the distance, low dark gnarly looking clouds slowly, VERY slowly moving our way. The humidity is through the roof but it’s still gorgeous and 93.

Then we heard it! The low grumble of an angry storm!

Then we felt it! A SUDDEN drop in temperature along with some high winds. Just like that, the humidity disappeared and the rains came!

Along with lightening, thunder, intermittent satellite signals and sporadic power flickers. Graduation parties were over…ironically except for the die hard adult party goers!

Today I awoke to lots of standing water in the backyard and a high of 63 degrees but thankfully nothing else worse for the wear. Friends of ours to the east were drenched with thunder and lightening storms coupled with golf ball sized hail! HAIL! Thankfully we had no tornadoes in the area! (BTW, tornadoes are EXTREMELY uncommon in this part of the Midwest!) They’re talking more rain tonight but hopefully it will sweep around us.

I think the bad weather rained on my culinary mojo too!

Easy Sopapillas from Pepperidge FarmWe’re attending a BBQ later today and was asked to bring a side dish or dessert plus any alcoholic beverages we’d planned to drink. I had planned on taking a mini dessert of some sort. Something easy to eat while you walk around socializing or chasing kids. Suddenly, my mind went blank! I reached out to my new friends at the Momdot Forum for some inspiration and those ladies quickly came through.

I’m altering my original Cheaty Cheesecake recipe making mini version with a pie pastry instead of graham cracker crust. I also plan to make an American version of the Sopapilla. I’m shortcutting the process a bit by using store bought pie dough and puff pastry but it’s a holiday so forgive me! ;)

Sopapillas are really easy and I’m simply putting a twist on Pepperidge Farm’s recipe. Cut sheets of thawed puff pastry into 2” squares and bake according to package directions till golden. Toss warm pastries with a cinnamon-sugar mixture in a paper bag till thoroughly coated. Instead of honey. I’ll drizzle simple icing made with powdered sugar and milk and topped with a sliced strawberry!

Mini Cheaty Cheesecake Recipe

Ingredients

  • pie dough
  • 1 (8 ounce) brick of cream cheese softened
  • 1 cup of whipped cream plus another cup reserved
  • 1 package of instant pudding (either vanilla or lemon flavored)
  • 1/2 cup sugar
  • 2 tsp of lemon extract
  • fresh berries for topping 

DirectionsThe Original Cheaty Cheesecake

Make mini pie shells. Cut pie pastry into circle large enough to fit inside a muffin tin without any excess sticking out of the top. Score with a fork so it doesn’t bubble while it bakes. Bake at 350 till golden, about 15-20 minutes.

Prepare your filling while mini pie shells are cooking and cooling. Whisk sugar and pudding mix and blend well with softened cream cheese and lemon extract! Fold in 1 cup of whipped cream. Spoon into completely cooled mini pie shells. Top with whole or sliced berries and garnish with a sprig of mint.

*Click to view my original Cheaty Cheesecake Recipe pictured above.

Jenn is a southern girl raising her family with her husband in NW Minnesota. Living on one income doesn’t mean we have to live without! Find coupons, freebies, recipes, parenting strategies, homemaking tips, product reviews, and giveaways at her blog, Frugal Front Porch.

Thursday, May 27, 2010

MIFS #169- Strawberry Spinach Salad with Pecans and Balsamic Vinegar

Welcome to the carnival! The Make it from Scratch carnival is your chance to share your projects. I hope you join us by linking up at the bottom of this post.

I hope that you enjoy strawberries as much as I do. I have a feeling that my posts here are going to be all about strawberries for a little while. You see, I have a lot of strawberries to eat and preserve. (and they are still coming.)


My lastest strawberry recipe is Strawberry Spinach Salad with pecans and balsamic vinegar. This recipe came about like many of my kitchen creations; a compilation of several recipes using ingredients I have in the pantry. The roasted pecans and reduced balsamic vinegar make this simple spring salad a stand out.

Strawberry Spinach Salad with Pecans and Balsamic Vinegar

A perfect simple spring time salad!

See Strawberry Spinach Salad with Pecans and Balsamic Vinegar on Key Ingredient.


LINK UP YOUR PROJECTS!

Carnival Guidelines:


Link up your recipes, crafts, garden projects, yarn creations, home improvement, or other d-i-y posts. Posts about making something, or helpful resources and tips for making things are what we are all about.


Please link directly to the post, not to home page of your blog. Kindly link back to the carnival with twitter, stumble and/or from your blog.


Wednesday, May 26, 2010

Bellini Bar

It's summer, the season of guests! Pool parties, Fourth of July, Labor Day all mean groups of people lounging around outside. Great your guests with a Bellini bar to get things started off right! This recipe makes enough for 12 cool, delicious Bellinis.


2 cups sugar
1 cup water
1 (16-ounce) bag frozen peaches, thawed
1 teaspoon grated orange peel
1 (16-ounce) bag frozen strawberries, thawed
1 (16-ounce) bag frozen blueberries or blackberries, thawed
4 to 6 (750-ml) bottles Prosecco or other sparkling wine, chilled
Fresh strawberries, raspberries, and blueberries, for garnish
Orange peel twists, for garnish

Stir the sugar and water in a large saucepan over medium heat until the sugar dissolves, about 5 minutes. Cool completely.

Puree the peaches and orange peel in a blender with 1/2 cup of the sugar syrup until smooth. Strain through a fine-meshed strainer and into a bowl. Cover and refrigerate. In a clean blender puree the strawberries with 1/3 cup of the sugar syrup until smooth. Strain through a clean fine-meshed strainer and into another bowl. Discard the seeds. Puree the blueberries in a clean blender with 1/3 cup of the sugar syrup until smooth. Strain through a clean fine-meshed strainer and into a third bowl. Discard the seeds and solids. Pour each of the purees into clear glass bowls or small pitchers.

For each serving, pour 2 to 4 tablespoons of the desired fruit puree into a Champagne flute. Slowly pour enough Prosecco into the flute to fill. Gently stir to blend. Garnish with the whole berries, as desired, and serve.

Do-Ahead Tip: The fruit purees can each be made 1 day ahead. Cover separately and refrigerate.

Monday, May 24, 2010

Cool Semi-Homemade Summer Treats – Just in Time for Memorial Day!

Can you tell the difference between these two?

Homemade Ice Cream Sundae Cone Ice Cream Sundae Cone made by Nestle Drumstick

Both have rich vanilla ice cream. Both use a yummy sugar cone. Both have a delicious hard chocolate shell. Both are coated in crunchy peanuts.

Price for the one on the right is $8.73 for 16 at Sam’s.

Price for the one on the left…pennies on the dollar.

Why? The one on the left is homemade! This month’s edition of Food Network’s Magazine features a selection of semi-homemade ice cream truck style recipes. These types of treats can add up…quickly…especially if you purchase them in singles from the ice cream truck, convenience store, or concession stand. Making my own, even a semi-homemade version, will take the crunch out of my wallet this summer.

Start with store bought ice cream, sherbet, or frozen yogurt (or if your really adventurous, make you own). Allow it to soften slightly to make scooping and molding easier. Place a malted milk ball in the bottom of each chilled cone. This helps prevent drippage during consumption! Using store boughtor homemade hard shell chocolate syrup, coat the inside of chilled sugar cones. Allow chocolate to set. Scoop ice cream into each cone. Dip the top in the hard shell syrup and roll in chopped nuts. Place cones in chilled glasses on a baking sheet inside the freezer to allow ice cream to harden, approximately 2 hours. Once ice cream has completely set, place cones in a freezer bag for an ice cream truck style treat anytime!

The Food Network Magazine’s version of the Ice Cream Sundae Cones recipe includes a make it yourself hard shell chocolate sauce I’d like to try for even more savings on our frozen treats.

061I also liked their idea about making marbled orange cream popsicles. They used orange sherbet but any flavor will work, vanilla ice cream,  basic cookie cutters, parchment paper and popsicle sticks. I have a popsicle mold that will make this process much easier. Allow the ice cream to soften, then place alternate small scoops of ice cream/sherbet flavors into your mold. After several scoops, use a spoon or spatula to press the ice cream mixture down into the mold/cookie cutter. Add more alternating scoops of ice cream and press down again until the mold is full and smooth. With a popsicle mold, simply add the stick or top and pop back into the freezer till firm.

The cookie cutter method is a bit different and a bit more involved but produces a variety of shapes that’s certain to be a hit at your Memorial Day party. Cover the cookie cutter filled with ice cream with plastic wrap and freeze for an hour. Then remove the cookie cutter, insert your popsicle stick, smooth the ice cream if necessary then place on a secondary chilled baking sheet lined with parchment paper. Pop it back into the freezer until completely frozen. I’ll stick with my ice cream molds since they wolf them down faster than I can make them!

Ice Cream TacosHere are some links to other ice cream recipe ideas:

I plan to experiment with pureed fruit, fruit juices along some of these tempting ideas. What is your favorite frozen treat?

frugal front porch

Jenn is a SAHM with three kids of her own plus two step kids with her fabulous husband. She writes about her transition from 30 years of big city life in Tennessee to small town living in Northwestern Minnesota. Find recipes, home keeping tips, craft ideas, family strategies, plus giveaways and product reviews that help keep her budget in balance.

Friday, May 21, 2010

Pasta Bolognese


My Mom clipped an article for me, out of a grocery store's magazine, probably late last summer. It was a reader submission section, where one could write a short piece sharing a food related memory. She suggested that I write something and send it in - why not, she said.

It's taken me this long to get around to it. I can be such a fabulous procrastinator when I want to, yes?

Anyway.

I've finally written a piece. And because I waited so long, it doesn't look like the magazine has this reader submitted section anymore. So I'm feeling rather like a balloon that's lost it's air.

Will you read my article? It's about my son, the Bear, and a pretty fantabulous milestone he conquered just the other day, and it was all because of some pasta bolognese...

"My son Bear is two and a half years old. He's what some might call 'special needs' or 'challenged'; his main issue is hypopituitarism, which means his body does not produce certain necessary chemicals like yours and mine do.


Due to this deficiency, his development has been somewhat slower than typical kids his age so every milestone is celebrated because it's been achieved, rather than when he achieves it.


You see, when he was born, all the doctors and specialists at the children's hospital insinuated that he would be extremely dependent. Possibly never walking or talking, blindness was a strong possibility and consuming anything other than pureed food wasn't even brought up because it was so far fetched, at that time.


Turns out the specialists were wrong.


Bear is progressing well. Very well, in fact. Yes, he's delayed. We're just fine with that - because he is progressing.


A few days ago the Bear hit a pretty big milestone, in our opinions, anyway. He ate his entire dinner, by himself, with his fingers.


Previously he'd point at his spoon, then at either myself or my husband, communicating that he wanted us to feed him.
Not this time. He dug in with both hands and pasta bolognese spread far and wide.

I couldn't have been more excited to see bits of carrot and ground pork on my newly installed hardwood - not to mention every square inch of Bear's face, hair and
(thankfully) his dark colored t shirt. I was cheering him on with every meaty handful. He was terribly encouraged by this and joined me in arms-raised excitement.

That pasta bolognese recipe is going down in the memory books as
the meal that helped my son reach a long awaited milestone."


PS - it was really quite delicious, too.

This recipe makes a lot of ragu. I halved the recipe and had enough sauce to make a big pot of pasta for our dinner, plus leftovers for the Bear and I as well as my husband's lunch the next day - and I froze about four cups worth for future meals.

Ragu alla Bolognese
Lemons & Anchovies

2 pounds ground pork

1 pound ground turkey

1 1/2 pounds ground beef

2 - 28 ounce cans crushed tomatoes

1 small can tomato paste

3 ribs celery, chopped

2 carrots, chopped

1 onion, chopped

1/2 cup red wine or chicken stock, plus more if necessary

1/4 cup milk

grated Parmesan for serving

salt and pepper to taste

olive oil


Place celery, carrot and onion in a food processor and pulse till finely chopped. Saute the vegetables in olive oil in a large heavy bottomed pan over medium heat for 6-7 minutes. Raise heat to high and add the ground meats. Season with salt and pepper. Cook, stirring frequently, breaking up the meats as they cook.


When the meats become a light golden color (approximately 6-8 minutes), add the wine or chicken stock and scrape the bottom of the pan as it deglazes. Cook until the wine has almost reduced then add the tomato paste, tomatoes and more wine or stock if needed. Bring to a boil then simmer about 2 hours, stirring occasionally.

Add the milk during the last half hour of cooking.


At this time the sauce will be a medium thick consistency. If it's too dry, add more wine or stock. If it's not thick enough, allow to simmer longer to reduce and thicken.


Serve over your favorite pasta.


I blog over at Gotta Little Space and Suitable For Consumption - come on over and say hi! If you'd like to read more about my son, here's a link to posts about him!

Thursday, May 20, 2010

MIFS #168- Strawberry Freezer Jam

Welcome to the carnival! The Make it from Scratch carnival is your chance to share your projects. I hope you join us by linking up at the bottom of this post.

Last year we planted our strawberry patch. Dutifully, we picked off the blossoms so the plants would be strong and produce a better crop in the years to come. Our work has paid off, and we are enjoying the fresh ripe berries straight from our garden.

One of my favorite ways to preserve that fresh berry taste is with freezer jam. Freezer jam is quicker to make than traditional cooked jam. It sets softer, but I think, retains a much fresher flavor.

The recipe is from the Sure-Jell package: You'll need about a quart of strawberries, 1 box of Sure-Jell, 3/4 C water, and 4 cups of sugar. 

1. Wash your containers. You can use freezer boxes, jars, or recycled food containers. I often use sour cream and yogurt container to freeze in. Just be sure to label the container clearly. Freezer bags can be used too, but they tend to be pretty messy for freezer jam.

2. Rinse fruit and hull. Crush the berries, one cup at a time. A potato masher works best. You want to end up with 2 cups of crushed berries. Put them in a large bowl.


3. Measure out the sugar and stir it into the crushed berries. Let sit for 10 minutes, stirring occasionally.

4. Stir the box of pectin and 3/4 C water in a small pan. Bring to a boil on high heat, stirring constantly. Allow to boil 1 minute while stirring.

5. Stir pectin mixture into berries. Stir constantly for about 3 minutes, until the sugar crystals are dissolved.


6. Pour into containers. Leave about 1/2 of inch of head space.

7. Let stand at room temperature for 24 hours. Refrigerate for up to three weeks or freeze for up to a year.


LINK UP YOUR PROJECTS!
Carnival Guidelines:

Link up your recipes, crafts, garden projects, yarn creations, home improvement, or other d-i-y posts. Posts about making something, or helpful resources and tips for making things are what we are all about.

Please link directly to the post, not to home page of your blog.  Kindly link back to the carnival with twitter, stumble and/or from your blog.

Wednesday, May 19, 2010

Chickpeas and Mustard Greens

I joined a CSA this year and got my first share this past Saturday. It's early in the growing season and, as a result it was mostly all greens. I got mustard greens, kale, beet greens, salad greens, mixed steaming greens (?) and some sprouts. I was looking around for something to do with some of those greens and came across this one. It's a winner! Thanks to the Fat Free Vegan Kitchen for this great idea!


10 ounces mustard greens
1/2 large red onion, thinly sliced
4-6 tablespoons vegetable broth, divided
4 cloves garlic, chopped
1 pinch red pepper flakes
1/2 teaspoon salt (optional)
2 tablespoons balsamic vinegar
1/2 teaspoon soy sauce
1/4 teaspoon agave nectar or sugar
1 cup cooked chickpeas, rinsed and drained

Remove any large stems from the greens and discard. Tear the leaves into bite-sized pieces.

In a deep pot or wok, sauté the onion in a tablespoon or two of vegetable broth until mostly faded to pink, about 4 minutes. Add the chopped garlic and red pepper and another tablespoon of broth and cook, stirring, for another minute. Add the mustard greens, 2 tablespoons of broth, and cook, stirring, until greens are wilted but still bright green, about 3-5 minutes. Stir in the salt, if using. Remove greens and onions from pan with a slotted spoon and place in a serving dish, leaving any liquid in pan.

Add the balsamic vinegar, soy sauce, and agave or sugar to the liquid in the pan (if there is no liquid, add 2 tablespoons of broth). Add the chickpeas and cook, stirring, over medium heat until the liquid is reduced by about half. Spoon the chickpeas over the greens and drizzle the sauce over all.

Serve warm, with additional balsamic vinegar at the table.

Servings: 2

Give it a try and let me know what you think!

Monday, May 17, 2010

Yummy Morel Mushrooms – The Elusive Shroom!

Many apologies for the delayed post and missing last Monday’s posting. I really have no excuse except Spring Fever and the Wild Weekend I had this past weekend.

I am eager to share a great discovery with you.

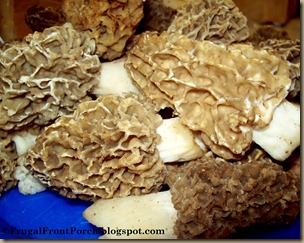
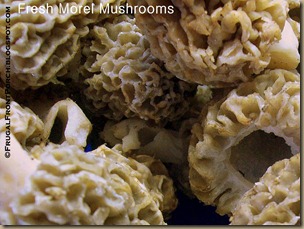
Friday, after helping a friend on his ranch, hubby brought home some strange looking mushrooms. At least he said they were mushrooms. Specifically Morel Mushrooms.Raw Wild Morel Mushrooms

After I confirmed they are indeed edible, I discovered they are a highly sought after delicacy and one of the few mushrooms no one has successfully cultivated for mass production. There appears to be a whole culture devoted to the great Morel Mushroom hunt! I was quite shocked.

I pondered how to prepare them. After all, I wanted to enjoy the full flavor of the mushroom but had NO IDEA how to clean or cook them. After telling my Frugal Front Porch readers, tweeting and Facebooking our discovery, I learned a few things.bloggy stuff 025

  1. NEVER eat them raw. I don’t know why but it’s the one theme repeated over and over on all the various sites and comments I read.
  2. They grow in a variety of places but it’s very difficult to predict where they’ll literally pop up.
  3. Morels are usually found in the early spring, especially after a wet spring.
  4. Soak them in cold salty water at least 24 hours to kill the “critters” that may be lurking inside the porous shell then rinse them with cold water before cooking.

I sautéed a batch in butter mixed with a bit of EVOO and I also battered a batch to see which method we preferred.

Sautéed was delicious on top of our steak but a little too slimy to enjoy on their own.

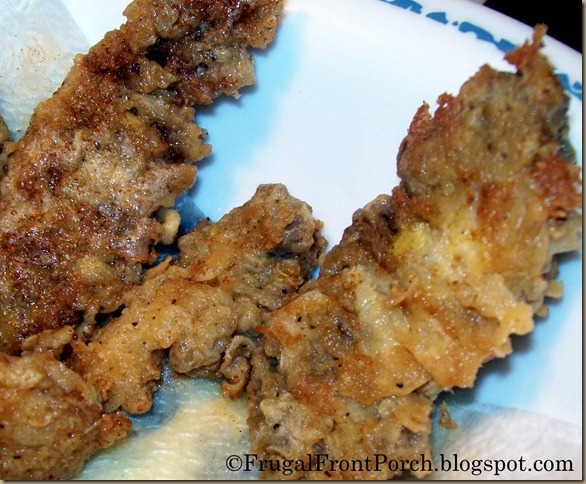
Battered is the way to go for an appetizer or side dish. I simply cut the Morels into quarters, dried them with a paper towel, dipped in a beaten egg with a few splashes of soy sauce and coated with a flour/cornstarch mixture. They went into a hot skillet with butter and EVOO till crispy brown.

These were delish but I can’t believe they run $25 for 4 ounces of dehydrated shrooms! As long as we can find them for free, I’ll eat them but I won’t pay THAT kind of price…no matter how good they taste!!!

Fried Morel Mushrooms

Monster Banner

Jenn is a SAHM who writes about living in Northwestern Minnesota raising a family on a budget. She loves to cook, craft, and is learning to garden and sew. You can read more about her life plus giveaways and product reviews at Frugal Front Porch. Be sure to enter the $200 Trace Your Family Tree giveaway sponsored by Archives.com before it ends May 22nd.
Thursday, May 13, 2010

Carnival #167 - Macaroni and Cheese

Welcome to the carnival! The Make it from Scratch carnival is your chance to share your projects. I hope you join us by linking up at the bottom of this post.

I'll admit it. I regularly purchase boxed macaroni and cheese. (Much to my eight year old's dismay. She prefers it made from scratch.) It isn't that I am particularly fond of boxed macaroni and cheese. It is just that is so darn convenient and cheap. Seriously, I can get a box at Aldi for $0.29. Easy and cheap fixin's are nice to have on hand for lunches.

Recently I won a House Party package. Among the party items were pouches of macaroni and cheese that promised to taste more like homemade. I made them for a picnic we attended, and the macaroni cheese was good. It did taste more like homemade than when it is  made from the powdered cheese that is contained in the cheap boxes.

But I had to wonder, as I made it, how is this any better or easier than homemade? The only thing more convenient was that the ingredients were already measured out for you. The steps involved were exactly the same. Cook macaroni. Melt butter. Stir in flour and seasonings. Stir in cheese. Add in macaroni. Serve or put in a baking dish to bake for a bit.

People, that is exactly how you make macaroni and cheese from scratch. Seriously, have we come so far from cooking from scratch that we are willing to pay more for a mix, containing mostly over processed food goods, that really only saves us time because the ingredients are pre-measured?  Really?!

Yes, I buy and serve my family the stuff in the box. It is convenient and cheap. But if I want to take the time to make good homemade macaroni and cheese, then I plan to make it from scratch. Thank you very much.

Homemade Macaroni and Cheese

An easy made from scratch classic.

See Homemade Macaroni and Cheese on Key Ingredient.


Photo credit: Wasabibratwurst

LINK UP YOUR PROJECTS!
Carnival Guidelines:

Link up your recipes, crafts, garden projects, yarn creations, home improvement, or other d-i-y posts. Posts about making something, or helpful resources and tips for making things is what we are all about.

Please link directly to the post, not to home page of your blog.  Kindly link back to the carnival with twitter, stumble and/or from your blog.

Wednesday, May 12, 2010

Rosemary Whole Wheat Sandwich Rolls

I make these rolls a lot. They are easy and the recipe only makes 6 rolls, which can be a good thing. I frequently make a double batch, let them cool, slice them, wrap them in waxed paper, put them in a gallon-sized freezer bag and put them in the freezer. When I want to use one for a sandwich I pull one out and pop it in the toaster. It's very convenient and I never have to worry about any of them going bad because I can't eat them fast enough. If you don't like the taste of rosemary or don't have access to any, just leave it out!

½ cup warm water (110º to 115º F.)

½ teaspoon sugar

1 (1/4 oz) pkg. fast-acting dry yeast

½ cup warm milk (110º to 115º F)

2 tablespoons butter, melted, cooled

1 ½ to 2 cups bread flour, divided - I just use regular flour

2 tablespoons chopped fresh rosemary

1 teaspoon salt

½ cup whole wheat flour

1 egg white, lightly beaten

6 tiny sprigs fresh rosemary

  1. Place water, sugar and yeast in large bowl of stand mixer with paddle attachment. (Dough also can be made by hand.) Let stand 2 to 3 minutes or until yeast is dissolved. Add milk, butter and 1 cup of the bread flour; beat at low speed until combined. Add chopped rosemary and salt; beat until combined. With mixer running, slowly add whole wheat flour and enough of the remaining bread flour to form a soft dough.

  1. Beat at medium-low speed 5 minutes or until smooth and elastic. (If making by hand, knead 10 minutes.) Place in greased medium bowl; cover with plastic wrap and towel. Let rise in warm place 30 minutes or until doubled in size.

  1. Gently punch down dough to deflate; place on lightly floured surface. Divide into 6 pieces. Form each piece into a ball; place on parchment paper-lined baking sheet. Cover with towel; let stand 3 minutes. Flatten into 3 ¾ inch rounds. Cover with towel; let rise 15 minutes.

  1. Place another lightweight baking sheet or pan on top of towel covering buns. (This will act as a weight, making buns flatter and more even.) When I did this I ended up with VERY flat buns! The next time I did it I did not put the cookie sheet on top for this rise and they came out perfectly. Let buns rise 25 minutes or until almost doubled in size (dough should hold slight indentation when gently pressed).

  1. Meanwhile, heat oven to 375ºF. Lightly brush top of buns with egg white; lightly press rosemary spring into center of each bun. I did not put the little rosemary sprigs on – seemed too fussy to me! Bake 20 minutes or until golden brown and bottoms sound hollow when gently tapped. Cool completely on wire rack.

Tuesday, May 11, 2010

Blueberry Breakfast Cupcakes

Photobucket

My 15-year-old daughter seems to be on a continual quest to improve her eating habits. Recently, she decided to go the vegetarian route, so I made a trip to Barnes and Noble and bought her this cookbook...

Photobucket

This book was written by a teenager for teenagers and she absolutely loves it...

Photobucket

We tweaked this recipe a little bit...

Photobucket

...adding the streusel topping, and these were really some of the best blueberries muffins we have ever had. Hope you love 'em, too!

Blueberry Breakfast Cupcakes

For the muffins:
1/2 cup butter
1 cup sugar
2 eggs
1 teaspoon vanilla
1 3/4 cups all-purpose flour
1 teaspoon baking soda
pinch of salt
1 teaspoon baking powder
1 1/2 cups sour cream
1 cup fresh or frozen unthawed blueberries

For the streusel:
2 tablespoons flour
5 tablespoons sugar
1/2 teaspoon cinnamon
2 tablespoons butter, diced
1/2 cup nuts (we used walnuts)

Step 1: Preheat oven to 350 degrees f. In a large mixing bowl, cream together butter and sugar until light and fluffy. Add eggs, one at a time, beating after each addition. Add the vanilla and set aside.

Step 2: In a medium-sized mixing bowl, combine the flour, baking soda, salt and baking powder. Whisk to blend. Alternately add the dry ingredients and 1 cup of the sour cream to the butter mixture. Fold the blueberries into the batter.

Step 3: Make the streusel topping by combining the flour, sugar and cinnamon, then cutting in the butter until small crumbs are formed. Lightly mix in the nuts.

Step 4: In a muffin pan, place muffin papers or lightly grease each cup. Fill each muffin cup three quarters full of batter. Place 1 teaspoon of the reamaining sourt cream on top of each unbaked muffin, then sprinkle on the strudel topping. 

Step 5: Bake in the preheated oven for 20 to 30 minutes, or until the muffins are lightly browned. Enjoy!

Photobucket

Friday, May 7, 2010

Lemon Lotion - A Natural Astringent


I've been looking for a good, as natural as possible astringent. When I posted about the World Beauty book, I told myself to make the lemon lotion. The recipe is dead simple - couple of lemons and a bottle of mineral water.

So I made some and so far, I'm liking it. Granted, you don't get that chemical burn 'tingle' that you get with store bought unpronounceable-ingredient toners but the end result is the same. And it's so fresh! My skin feels clean and the faint lemon scent is so refreshing.

Lemon Lotion
2 lemons

1 1/2 cups cold mineral water


Squeeze lemons and strain juice into a small bottle. Add mineral water. Use as an astringent after cleansing.


I didn't know what to put it in though; 1 1/2 cups is such an odd size, it would have been great to use some sort of apothecary bottle or something. For now I used an old jelly jar but I'm planning on doing some thrifting today so I'll keep my eye out for a more permanent vessel.


I blog regularly at Gotta Little Space and Suitable For Consumption - come say hi!

Thursday, May 6, 2010

Carnival #166 - My Raised Beds and Pea Trellis

Welcome to the carnival! The Make it from Scratch carnival is your chance to share your projects. I hope you join us by linking up at the bottom of this post.

Around here the majority of the project I have going involve the garden. It is prime planting time.

Today I am sharing my made with what you have on hand raised beds and pea trellis. Our neighbor gave us several old window frames this spring. My intention was to use them to create cold frames and get an early start on our garden projects. We laid down a perimeter of block for under the frames, and filled the area about half way with dirt. The project got started too late to be useful as a cold frame. So, instead we are using them as raised beds.

Peas are growing in one of the beds. The trellis is also created from things we have on hand around the house. I used two metal pieces to create the arches. Honestly, I am not entirely sure what the original intent of these pieces were, but they function very nicely as a trellis frame for my peas. Then I tied twine between to create a fence for the peas to grow up. It is working out very nicely.

What are you growing, cooking, and creating? Can't wait to see!


LINK UP YOUR PROJECTS!
Carnival Guidelines:

Link up your recipes, crafts, garden projects, yarn creations, home improvement, or other d-i-y posts. Posts about making something, or helpful resources and tips for making things is what we are all about.

Please link directly to the post, not to home page of your blog.  Kindly link back to the carnival with twitter, stumble and/or from your blog.

Wednesday, May 5, 2010

Five Minute Mug Cake

This could be construed as a dangerous recipe. Just think, you're sitting on the couch, late at night, watching a movie and a sweet tooth attack strikes. You could be eating chocolate cake in five minutes. Pretty tempting! On the other hand, or so I tell myself, it's only a mug's worth. You could be snarfing through a 13 x 9 pan of chocolate cake. How much harm could a mug's worth of chocolate cake be really? Even topped with a quick confectioner's sugar and milk frosting, it's only one piece, right?!


Here it is:

4 tablespoons flour

4 tablespoons sugar

2 tablespoons cocoa

1 egg

3 tablespoons milk

3 tablespoons oil

3 tablespoons chocolate chips (optional)

A small splash of vanilla extract

1 large coffee mug

Add dry ingredients to mug, and mix well. Add the egg and mix thoroughly.

Pour in the milk and oil and mix well.

Add the chocolate chips (if using) and vanilla extract, and mix again.

Put your mug in the microwave and cook for 3 minutes at 1000 watts.

The cake will rise over the top of the mug, but don't be alarmed!

Allow to cool a little, and tip out onto a plate if desired.

EAT! (this can serve 2 if you want to feel slightly more virtuous).


Notes: You really need to experiment with the cooking time in your microwave as that will seriously affect the texture. I find 2 minutes is the perfect amount of cooking time in my microwave.

I use brown sugar as it adds a little more moisture. I also add all sorts of additional flavorings, as the mood strikes me. A dash of mint extract is good. A pinch of expresso powder is delicious. Broken up Andes chocolate mint candies are fantastic.

Mixing the ingredients in a bowl and then pouring it into the mug works better for me. I usually don't even use a mug, I use a circular, shallow 4 or 5" ramekin, like you might use for creme brulee.

Experiment, have fun, squash your guilt!

Tuesday, May 4, 2010

A Little Wild Salad

We enjoyed our first fresh picked salad of the season. It is amazing to me how much better a salad tastes when I've just picked the greens. Even the freshest store lettuce can not compare.

Last night's salad began with some leaf lettuce and spinach harvested from a small raised bed. The harvest was not quite enough to feed this family of six. I decided to supplement my garden harvest with a bit of wild greens.

A short walk around the yard added dandelion, carrot greens, and broad leaf plantain.  Other wild greens that are good for a salad (and are pictured above) include, chicory, wild lettuce, curly dock, winter cress flower buds, and young wild garlic greens.

Foraging is a hobby I wish I had more time for. There are so many interesting a delicious things to find. And the best part, you don't have to plant or tend any of the bounty that grows wildly. You only need gather it. These types of edible weeds (and more) thrive in what "Wildman" Steve Brill calls, disturbed areas, in his book Identifying and Harvesting Edible and Medicinal Plants. Disturbed areas are simply places where the dirt has been moved and things have been changed, such a a driveway.

You see many of these plants as you drive down the highway. Many of them are right in your yard, or grow in the cracks of your driveway. You probably recognize chicory in bloom with it's distinctive blue flowers. Wild carrot you may know by another name: Queen Anne's Lace.

The spring mix added a lot of fresh flavor to the salad. Combined with our fresh garden lettuce and a few store bought vegetables it made for a delicious salad. Add a baked potato bar, and call it dinner.

Bring on the fresh garden and wild veggies. They are delicious and healthy, not to mention very affordable.


Stephanie is a wife and mother of four attempting to live a simple and frugal life. She also blogs at Stop the Ride and Adventures in the 100 Acre Woods.

Monday, May 3, 2010

Grow Plants in ANY Container

I admit, my green thumb needs some serious adjustment since we moved to Minnesota in 2008 but BEFORE I could grow the heck out plants. It's quite possible I'm overwatering my plants since Tennessee is significantly hotter than Northwestern Minnesota. The other possibility is the difference in the soil. I plant to consult with my local Agriculture Extension office later today to see what if they can help with soil testing.

The one thing I have learned over the years is how to use all sort of containers to start seeds and cultivate plants in.

You need three things when constructing your own planter:

  1. Drainage - Proper drainage is key to preventing root rot and good plant health.

    • The most obvious method to create proper drainage is to drill a few holes in the bottom of your container. If you can't drill a hole then use either packing peanuts or wadded up newspaper to create a space in the bottom of the container for excess water to drain. You can use rocks but they add to the weight of the container. I've used all three methods successfully but prefer using the newspaper and packing peanuts for a lighter planter.

  2. Soil - Make sure you have soil full of nutrients.

    • I've used Miracle Gro in the past with satisfactory results. This year, I'm trying a new soil additive, KoKo Pro. It's an organic peat comprised of coconut shells. It claims to be super absorbant so I hope this will help with my compulsion to overwater the plants. It was a lot cheaper than Miracle Gro ringing in under $12 for 10 pounds. We'll see how well it performs.

    • I also prefer to use newspaper formed pots or egg shells to grow my seeds in it naturally decomposes in the ground. It makes planting easier and adds to the soil when it's fully decomp'd. To make newspaper pots, simply grab a cup the size you need for the plant, place several layers of newspaper inside the cup with the excess rubber banded to the outside of the cup. Add your soil, your plant, and water well. You know when to rewater the plant when the newspaper is dry.  Once the plant is ready to be transplanted, wait for the paper to be dry (it will make things easier), remove the rubber bands from the cup, use the excess newspaper like handles to lift from the cup and replant where you like.

    • I also like to toss our used coffee and tea grounds, filter and all, in the plants. Crushed eggs shells and bits of banana peelings are often placed in my potting mix to help enrich the soil.

  3. Sun - Your plants will need adequate sunlight. Either grow them in a sunny window or under a flourescent grow light. This will improve your plant's health and speed up growing.
If you want your homemade container to look pretty, then you have several options. You can paint the container, Modge Podge some fabric or pretty paper to it, or simply use double sided sticky tape to wrap the fabric or paper around the container to make it easier to decorate. Obviously you do this before you plant anything in them but you can also leave them au naturale', letting the container's personality shine! I've got big plans for my old rubber boots and my new strawberry plants - just as soon as this overcast rainy weather passes!!!!

Here's some of the planters I've made from everyday household items. 
Egg Shell Planters (Don't know where the mushrooms came from!)

Oatmeal Containers, Juice Containers, Plastic Cups, Newspaper Cups


Sometimes you just need some water in a cup - like with these onions!
You can use a number of items from around the house.


  • baskets
  • cups
  • laundry baskets
  • light fixture globes
  • shoes
  • bowls
  • hampers
  • suitcases
  • hats
  • pots
  • old desk drawers
  • handbags

Basically if it can hold dirt, you can make it hold a plan. In the case of baskets, or something with holes in the sides of the container, you can use a garbage bag to line the container with then poke a few holes in the bottom or add packing peanuts for drainage.
What the most unusual planting container you've ever used or seen?
frugal front porch 

Jenn also blogs about family, food, & crafts, on a budget with product reviews and giveaways on her blog Frugal Front Porch. Be sure to enter the Wonder Hanger Giveaway and link up to Strut Your Stuff blog meme.

Header designed by Crystal. Thanks!