Showing posts with label preserving. Show all posts

Thursday, September 2, 2010

Carnival #182 - Apple Sauce

Welcome to the carnival! The Make it from Scratch carnival is your chance to share your projects. I hope you join us by linking up at the bottom of this post.

The peak of apples season is just around the corner. Depending on the variety of apples available to you, you may find them plentiful now. You can pick your own or purchase them in quantity for a good price. There are so many wonderful things you can make with apples to consume now, or to preserve for later. If your family eats applesauce like mine does, applesauce will be at the top of the to make list.

Making applesauce is very easy. It really is just cooked mushed apples. If you are making quantities to preserve, it does take a bit of time, but is a simple process. A good firm, slightly tart variety of apple make the best sauce in my opinion. Transparents are wonderful, but I usually have more Golden Delicious available to me, and that is what I use.

First quarter the apples. No need to peel or core. Place them in a large pot with enough water to cover the bottom of the pot. Cook on medium high heat. Be sure to stir periodically and to scrape the bottom. A little bit of scorching will change the flavor of the whole batch. When the apples are very mushy, they are ready to be processed.

A Sauce Master makes quick work of the apples producing a nice thick sauce and removing all the seeds and peels. If you don't have a Sauce Master, the cooked apples can also be pushed through a sieve to remove the unwanted parts. Alternatively, apples can be peeled and cored before cooking. They will cook to a mush with stirring.

Applesauce freezes and cans well. To freeze, sweeten the sauce if desired, and fill containers; freezer boxes, jars, or even recycled containers like yogurt ones work well. Be sure to leave plenty of head space (about an inch) for the sauce to expand as it freezes.


To can the applesauce, heat the sauce and sweeten if desired. Pack into clean hot jars, and put lids on. My canning book recommends 1/2 inch head space. I've found that an inch head space really works better. Jars can be sealed with a pressure canner or in boiling water. Pressure can at 6 pounds pressure, 8 minutes for pints and 10 minutes for quarts. Or process in boiling water 15 minutes for pints and 20 minutes for quarts.

Trouble Shooting
The biggest problem I have had with canning apple sauce is the jars oozing out apple sauce when I removed them from the pressure canner. The jars still seal. The sauce is still good, but it makes a big sticky mess. Here are some tips to help avoid that problem:

  • Leave extra head space.
  • Make the sauce a bit thinner.
  • Let the jars cool longer in the canner. It seems to be the sudden temperature change that causes the oozing. Letting the jars cool slowly has been the best fix for the problem.
Need more apple ideas?
Apple Ginger Preserves
Crockpot Apple Butter
Apple Cider Vinegar
Canning Sliced Apples
Apple Pie Filling

Don't forget to enter our Nakano Giveaway. Win $35 gift card, Nakano seasoned rice vinegar, and a recipe booklet. Drawing is tomorrow.

Stephanie is a mom, homeschooler, homesteader in the hills of West Virginia. Find more of her adventures at Adventures in the 100 Acre Wood.

LINK UP YOUR PROJECTS!

Carnival Guidelines:

Link up your recipes, crafts, garden projects, yarn creations, home improvement, or other d-i-y posts. Posts about making something, or helpful resources and tips for making things are what we are all about.


Please link directly to the post, not to home page of your blog. Kindly link back to the carnival with twitter, stumble and/or from your blog.

Friday, August 27, 2010

Spicy Pickled Green Beans


First time pickling green beans, over here. I think it went well...I guess we'll find out in a few months! My in laws are on vacation and told me I could harvest in the garden. I'd wanted to try simple green bean canning and since my beans are coming to an end, I'm jumping at the chance to pick some of their green beans!

Are you pickling/canning/putting anything up this year?

Spicy Pickled Green Beans
Food.com
Makes 4 pints

3 pounds green beans
4 long thin red chilies (use gloves when handling!)
3 large garlic cloves
1 tablespoon peppercorns
1/4 cup fresh dill
2 1/2 cups water
2 1/2 cups white vinegar
1/4 cup salt

Trim and remove string from green beans. Cut to fit into jars. Prepare jars, rings and lids for canning.

Bring water, vinegar and salt to the boil.

Fill each jar with beans until they are snug. Insert chilies and garlic. Divide peppercorns amongst jars. Divide dill amongst jars. Ladle the boiled pickling liquid into the jars leaving headspace. Wipe rims of jars, apply lid and screw on rings. Process in boiling water bath for 12 minutes.

Remove carefully and allow to cool to room temperature. During this cooling time, you'll hear quiet pops letting you know your jars have sealed. If by the next day, some of the jars haven't sealed, you can store in refrigerator to be eaten as soon as possible. Allow the sealed jars to sit at least one month in a cool, dark place before opening.

Thursday, August 12, 2010

Carnival #180 - Pickled Pepper Rings

Welcome to the carnival! The Make it from Scratch carnival is your chance to share your projects. I hope you join us by linking up at the bottom of this post.


The hot banana peppers are looking good in the garden this year. They are big, and they are hot. Just the way we like them. The easiest way to preserve hot peppers is by pickling them.

I love having pickled hot peppers on hand to add to Mexican dishes, put on a pizza, or give a sandwich some zip.

Preparing the Peppers
It is a good idea to wear rubber gloves when working with hot peppers. Wash peppers. Discard stems. Cut in 1/2 inch thick rings. You can remove the seeds if you wish, but I leave them.


Pickling juice (enough for about a dozen large banana peppers to yield about 5 pints of pickled peppers)
6 C white vinegar
2 C water
4 cloves of garlic, crushed

Combine ingredients and bring to a boil over medium-high heat. Reduce heat and gently boil about five minutes. Strain to remove the garlic. Keep liquid hot.

Pack pepper rings into hot jars leaving at least 1/2 inch headspace. Cover with hot juice. Wipe rim and screw lid on to finger tip tight. Boiling water process (be sure water is covering the jars) for 10 minutes (don't start timing until water is back to a boil.) Wait five minutes. Remove jars to cool. Refrigerate any unsealed jars.

TIPS
If you only have a few peppers to pickle, you can skip the boiling water bath, and just store your pickled peppers in the refrigerator.

You can use many varieties of peppers with this recipe, or even mix your peppers.


LINK UP YOUR PROJECTS!

Carnival Guidelines:

Link up your recipes, crafts, garden projects, yarn creations, home improvement, or other d-i-y posts. Posts about making something, or helpful resources and tips for making things are what we are all about.


Please link directly to the post, not to home page of your blog. Kindly link back to the carnival with twitter, stumble and/or from your blog.

Thursday, July 22, 2010

Carnival #177 - Hot Pepper Jam

Welcome to the carnival! The Make it from Scratch carnival is your chance to share your projects. I hope you join us by linking up at the bottom of this post.

I remember the first time I encountered hot pepper jam. It was at a Tastefully Simple party, and the whole notion of hot peppers in a jam seemed completely foreign to me. Yet, when they served some of this jam over a block of cream cheese with crackers, I knew I had to try it. It was a surprisingly delightful experience. I have been a fan of pepper jam ever since.

So, when I began growing my own hot peppers, I knew just what I wanted to make with them. This recipe is adapted from the hot pepper relish recipe included in the Sure-Jell package.

1 package Sure-Jell
5 C sugar
1 C cider vinegar
4 C finely chopped peppers. (The recipe called for a mix green, red and jalapeño. I used only hot peppers. About 3 C jalapeño and 1 C banana peppers.)

Mix peppers, cider and Sure-Jell in a saucepan. Measure sugar out into a separate bowl. Bring pepper mixture to a full boil on high heat. Stir in sugar. Bring back to a boil and boil for 1 minute. Stir constantly. Ladle into hot jars. Boiling water process for ten minutes. Yield: 4 pints.

Some tips: Wear plastic gloves when working with the hot peppers. Seed and remove the membranes of the peppers if you don't like a lot of heat. The jam made with all the seeds and membranes removed has a wonderful flavor, but hardly any heat. Leave a few seeds to kick it up a bit.

Uses: Pepper jam is great poured over a block of softened cream cheese and served with crackers. It can be used on sandwiches like relish, or as a dipping sauce. I think it would be delicious over chicken too.

Stephanie is a mom, homeschooler, homesteader in the hills of West Virginia. Find more of her adventures at Adventures in the 100 Acre Wood.

LINK UP YOUR PROJECTS!


Carnival Guidelines:


Link up your recipes, crafts, garden projects, yarn creations, home improvement, or other d-i-y posts. Posts about making something, or helpful resources and tips for making things are what we are all about.


Please link directly to the post, not to home page of your blog. Kindly link back to the carnival with twitter, stumble and/or from your blog.

Thursday, June 10, 2010

Carnival #171 - Freezing Sugar Snap Peas

Welcome to the carnival! The Make it from Scratch carnival is your chance to share your projects. I hope you join us by linking up at the bottom of this post. 

There really is nothing like fresh peas from the garden, so sweet and delicious. If you do not have some growing in your garden, I encourage you to stop by your local produce market to get some.

Peas do have their down side though. We have never planted a lot of peas because they yield very little for the amount of work they take. Peas are very easy to grow. The work comes with the harvest; more specifically with the shelling of the peas. A huge bowl of pea pods will yield about enough for one dinner for my family of six. So, while we thoroughly enjoy our fresh peas, we seldom have any to freeze for the  winter. But not this year.

This year, in addition to shell peas, we planted sugar snap peas. Sugar snap peas have a wonderful sweet flavor with an added bonus. The pods are edible. So a huge bowl of pea pods actually yields a huge bowl of peas to eat. They are wonderful fresh served with dip, or cut up into salad. They are great in soups, stir-fry, or just lightly steamed.

I am so excited to have some of these frozen to use over the winter. Here is how you freeze them.


1. Wash the pods.
2. String the peas by pinching the ends and pulling off the strings on the top and bottom.
3. Blanch. Place peas in boiling water for two minutes. Lift peas out and plunge into ice cold water for two minutes.
4. Drain.
5. Pack into freezer bags or containers. Leave 1/2 inch headspace, seal, and freeze.


LINK UP YOUR PROJECTS!

Carnival Guidelines:


Link up your recipes, crafts, garden projects, yarn creations, home improvement, or other d-i-y posts. Posts about making something, or helpful resources and tips for making things are what we are all about.


Please link directly to the post, not to home page of your blog. Kindly link back to the carnival with twitter, stumble and/or from your blog.

Thursday, June 3, 2010

Carnival #170

Welcome to the carnival! The Make it from Scratch carnival is your chance to share your projects. I hope you join us by linking up at the bottom of this post. Trying the thumbnail version of  the linking tool. Love to hear which version you prefer.

The strawberries are almost done. I am not exactly sure if that makes me sad or happy. I don't think we could ever have too many strawberries, but it will be nice to move on to something new. Not to mention, I'm having a little trouble keeping up with all the strawberries.

Which is why my MIFS post this week is about things in process instead of things that are completed. Currently in process in my kitchen is Strawberry Cordial. This is the strawberry version of the Blackberry Cordial that I made last summer. This was so delicious. I can't wait to try the strawberry version.


The next strawberry project on the agenda is something new to me,  Strawberry Lemonade concentrate. This project is in process also. Well, in the very early stages of the process. The berries are cleaned and hulled. That counts as starting doesn't it?

I first came across the recipe for this in my Ball Complete Book of Home Preserving. Recession Therapy has a very similar recipe posted at her site.

I am very excited to try this. I imagine myself in the dead of winter mixing up a pitcher of strawberry lemonade, and bringing a little sunshine to the day.   Well, I guess that means I need to get moving and  bottle up some of that summer goodness.

Photo credit: 101 Recipes

What have you been working on this week?


LINK UP YOUR PROJECTS!

Carnival Guidelines:


Link up your recipes, crafts, garden projects, yarn creations, home improvement, or other d-i-y posts. Posts about making something, or helpful resources and tips for making things are what we are all about.


Please link directly to the post, not to home page of your blog. Kindly link back to the carnival with twitter, stumble and/or from your blog.

Thursday, February 4, 2010

Blackberry Cordial with Cream and Chocolate

Every summer we pick blackberries. We pick a lot of blackberries. We make a lot of cobblers, dumplings, and of course jam and freezer jam.

Every year after the standards are made we also make something a little more unusual. One year it was a drink concentrate, blackberry shrub. Another year we let the berries ferment into blackberry vinegar. Last May when I saw the post Berry Cordial Making over at Not Dabbling in Normal, I knew what we'd be making that summer.

Creating the berry cordial is simply a matter of mixing the berries and vodka in a jar. Then you wait. Strain, and mix the berries with sugar, and wait again. After a month you strain again, enjoy the berries over ice cream (they were so good!) and let the cordial sit again for a few months. It is an extremely simple process that just involves quite a bit of wait time. For more specific instructions see Berry Cordial Making.

When it was finally ready I couldn't wait to taste it. The first taste was with the cordial over ice. It was good, but a little strong. My sister in law suggested serving it with a little cream, kind of like a white Russian. It was a very good suggestion. We filled a glass with ice and then filled it about 3/4 full of the cordial, and topped it off with cream. It was quite delicious, but what really put this drink over the top was a squirt of chocolate syrup. So good.....too good...

I still have a few quarts of berries in the freezer. I was planning to use them to make some more jam, but we may just have to forgo the jam and make more cordial. We can make jam in July when there are more fresh berries to use!

Thursday, November 19, 2009

Canning and Using Stew Meat


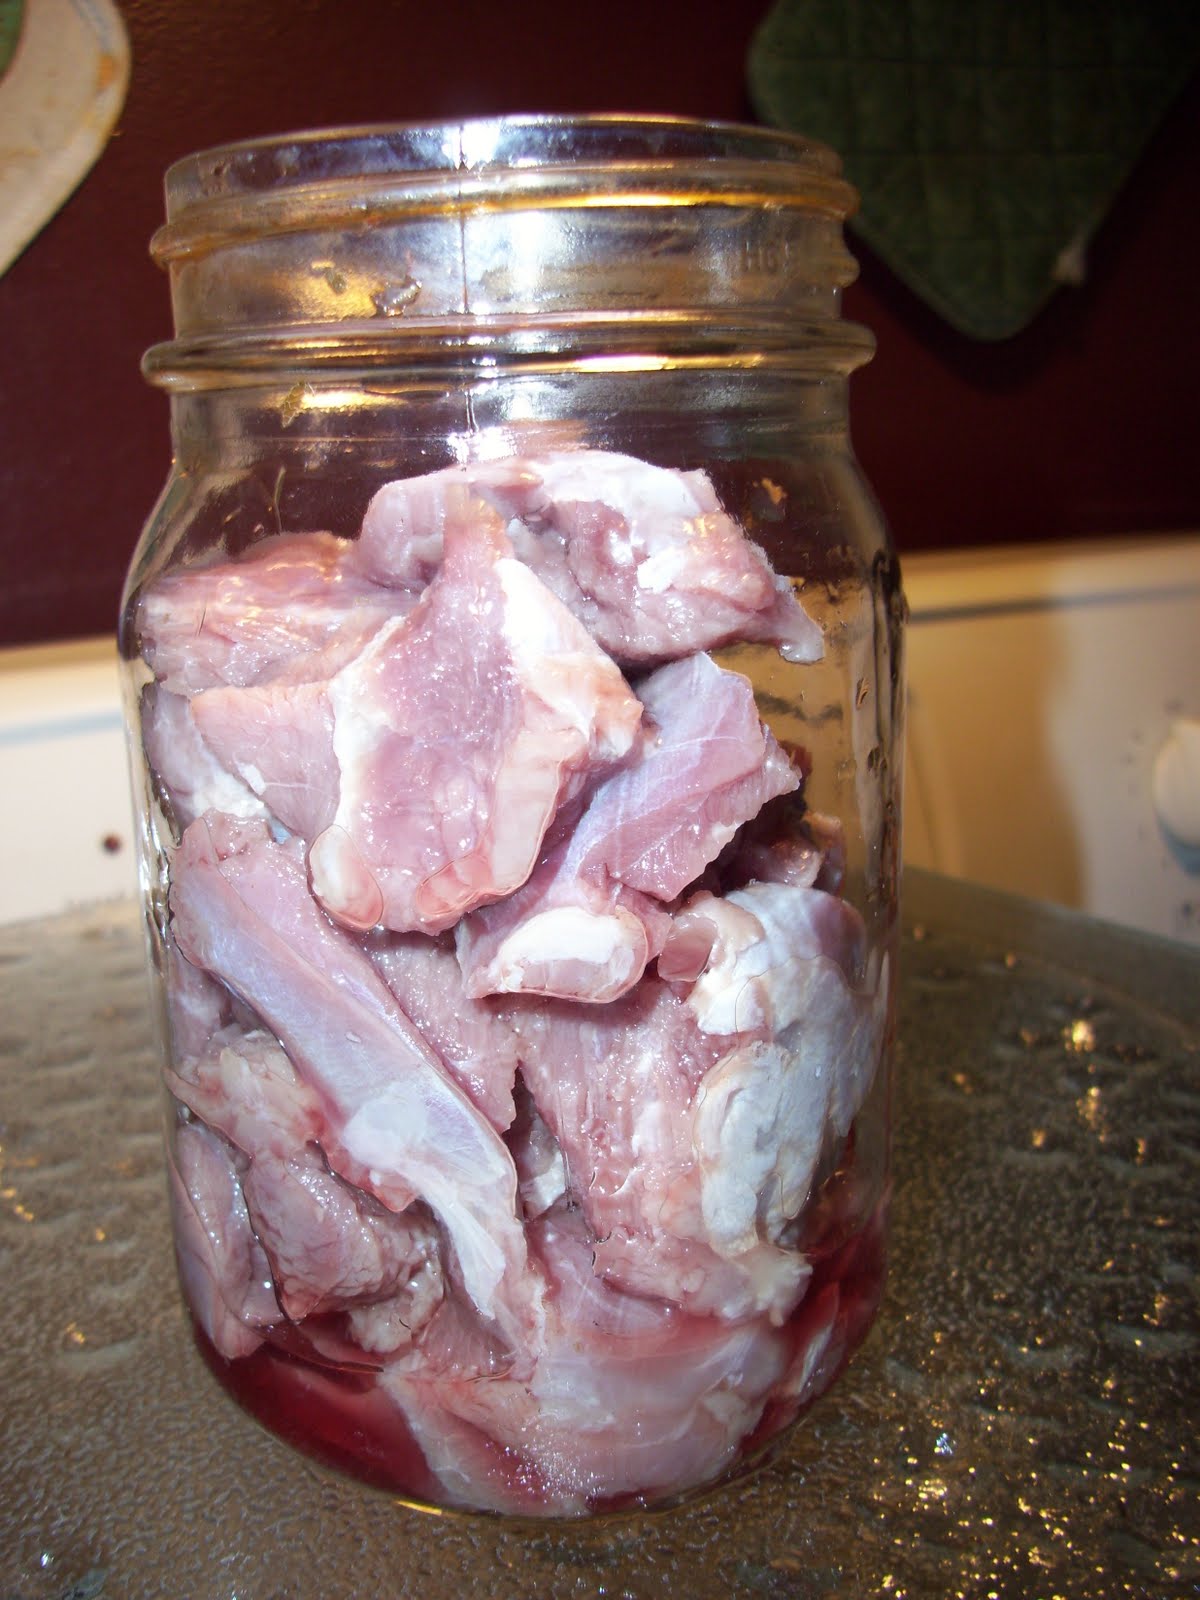
I know this jar of meat doesn't look all that appealing, but I promise you that inside this jar is the tastiest quick meal starter ever.

Let's face it. Even those of us who thoroughly enjoy cooking and are committed to making food from scratch for our families, need a few quick and easy meals every now and then. The way I see it, we have two choices. We can buy heavily processed convenience foods filled with who knows what, or we can create some convenience foods of our own. I'd rather make my own. My favorite "convenience" food is canned stew meat.

Canning meat is a little time consuming, but the process is easy and the time involved is mostly passive while the pressure cooker is running.

First you need meat. Canning is perfect for the tougher cuts of meat. I can the leg meat and other small pieces from venison, but this process works for other red meats like beef, lamb or pork. This is a great way to preserve meat when you come across a fabulous sale.

Trim as much fat as possible, and cut the meat into cubes or chunks.

Pack raw meat into clean, hot jars. Loose pack and leave one inch head space. Put lids and rings on.

Process at 11 pounds pressure; 75 minutes for pints, and 90 minutes for quarts.

As the meat cooks under pressure it becomes extremely tender. Far more tender than I've ever been able to cook stew meat on the stove or in the oven. It also creates its own broth. The meat and broth together make a delicious quick start to a meal.

So, how do you use canned stewed meat? Here are some ideas:

Soups or Stews.
It is great for chili, vegetable soup, beef stew or any other stew or soup you like to make that calls for meat. Just add some water, tomato juice or more broth, vegetables, and spices.

Pot Pies
You may need to drain the meat a little for this use. Reserve the broth for later use. Mix in vegetables throw it in a crust and bake.

Beef and Noodles
Cook the noodles in broth. Add the stew meat and spices, and thicken with sour cream or corn starch.

Gravy
Sautee mushrooms and onions. Add some flour and then slowly add in the meat with the broth to create a gravy. Serve over mashed potatoes, toast or both, hot roast beef sandwich style.

Barbecue
Drain the meat. Add barbecue sauce. Heat and eat.

Beef and Rice
Cook rice in broth and water with spices and vegetables. Add in the meat.

I love having this ready cooked meat on hand to use when I've failed to plan or the plan has failed. It is cheaper, tastier, and likely more nutritious than any convenience food I could pick up at the store.

Thursday, November 12, 2009

Making and Canning Broth

Soups and stews are staples in our fall and winter menus. I find them so warm and satisfying on a chilly day. It also helps that they are frugal menu choices, in most cases, and can be made from what you have on hand. That is my kind of cooking!

A good soup starts with a good broth. Making your own broth is a healthy and economical alternative to purchasing canned broth for your recipes. It also is very easy.

It is hunting season around here, and frequently you will find a pot of venison bones simmering on my stove. Those "leftovers" from the meat processing will become the base of many body warming soups over the winter months.

You don't have to have a hunter in the family though, to make your own broth. Making broth is easy, and can be done with any meat. I most often make venison broth, but often I make chicken broth. To make chicken broth, I roast a chicken one night for dinner, and the next day use the carcass to make broth.

Place the bones in a large stockpot. Cover them with water. Cover the pot and simmer until the broth is to your liking. Larger pieces, like venison, will take longer. Those will need to simmer for three to four hours. Smaller pieces, like chicken, only need an hour or less. Remove the bones. It is not essential, but I often will also strain the broth at this point. Meat that remains on the bones, or that is caught in the strainer, can be picked off and added back into the broth. Allow the broth to cool. When the broth has cooled skim off the fat.

Many cooks will add spices and vegetables to the simmering pot to enhance the flavor of the broth. I do not. I make a simple broth, and then add spices and flavorings when I use the broth later.

If you have made a large batch of broth, it is easily preserved. It can be frozen in freezer containers, or it can be canned. I prefer canning for the ease of use later. Broth should be pressured canned at 11 pounds pressure. Pints need 20 minutes, while quarts need 25 minutes.

Making your own broth is a very easy procedure. The time involved is almost entirely for simmering, and the end result is so much better than buying broth in a can. I encourage you to give it a try!

Many soups in my home start with this basic broth, but my favorite jump start to soup is starting it with canned stew meat. Check here next Thursday for more on that!

Thursday, August 20, 2009

Home Canned Apple Pie Filling

Last week we began picking apples. Our first apples are wild ones that are firm and tart. They are great for baking, and many of them become apple crisp. We also can a lot of apples, mostly in the form of applesauce.

In previous years I have canned apple slices. One year they turned out pretty well. The next they were just mush. I think the difference was in the type of apple used. This year I wanted to try something different.

A friend mentioned she had a good recipe for apple pie filling. Perfect!

apples peeled, cored and sliced
9 cups water
1 cup corn starch
4.5 cups of sugar
2 Tbsp cinnamon
1 tsp nutmeg
1 Tbsp lemon juice

Bring 8 cups of the water, sugar, cinnamon, nutmeg and lemon juice to a boil. Mix remaining cup of water with corn starch and slowly add to boiling mixture.

Pack apples into hot sterilized jars. Pour the boiled mixture over the apples, leaving 1" head space. Seal and process in a hot water bath for 20 minutes.


I'm not exactly sure how many apples I used, but I ended up with 6 quarts of filling. It all looked pretty in the jar, but the real test is in the tasting. We opened a jar last night. After all, we have to know if we like it before I make another batch.

I used it to make an apple crisp. Using the canned pie filling is not as good as fresh apples in my opinion, but the filling was quite delicious. The apples were soft, but did not turn into mush. I will be making more of this pie filling. The only thing I will change is using less sugar when I make the crisp topping. The sugar in the filling is more than sufficient.

Need more ideas for apples?
Crockpot Apple Butter
Apple Ginger Preserves
Make your own Apple Cider Vinegar


Saturday, August 1, 2009

Firsts on the First - Preserving Cabbage

I've grown cabbage before, but only enough to eat. This year we planted quite a bit more in the spring, and started some from seed a few weeks ago for a fall crop. There is no way we are going to eat all that cabbage. Time to learn to preserve it!

A little over a week ago, we attended a play date with a group of friends. Hot dogs were grilled, and everyone brought a side dish to share. There was a bowl of coleslaw there that looked a little different than what I expect coleslaw to look like. I'm adventurous, so I added some of it to my hot dog. (It is a West Virginia custom, but one I've thoroughly embraced since living here.) It was different, but absolutely delicious.

Imagine my delight, knowing that I have a lot of cabbage, to find that it was a home canned slaw. Crystal was kind enough to share the recipe with me.

Slaw
1 medium cabbage
1 large carrot
1 green pepper
1 small onion
1 tsp salt
-syrup-
1 cup vinegar
1/4 cup water
2 cups sugar
1 tsp celery seed
1 tsp mustard seed
*Boil syrup ingredients together one minute.
*let cool.
*shred together vegetables
*add salt
*let stand one hour
*Drain water from veggies
*rinse twice
*drain well
*pack tightly in pint jars
*pour enough syrup in each jar to fill space and bring to correct head space.
*seal
*process in BWB 15m.
*** Use as is or with mayo
My head of cabbage was fairly large. I doubled the other ingredients to accommodate. I did have some extra syrup left at the end, but just used it to make some fresh slaw for dinner.

I used the food processor to chop all the vegetables. The slicing blade worked very well for the cabbage, and the chopping blade did the job on the carrots. I used the grater on the onion and peppers, and I thought they were too fine that way. Next time I will simply chop those vegetables too.

I also packed mine in quart jars, and increased the boiling time to 20 minutes. My yield was three quarts.

And as if trying one new thing in a day weren't enough, I tried sauerkraut in a jar. I saw this recipe over at Laura Williams Musings last summer, when I had very little cabbage. This is a very simple recipe. Click on over there to see it.

I can't say for sure my cabbage preserving was a success, since we have not yet tasted the finished product. They sure do look pretty in the jars though!


How about you? Try anything new recently? Won't you share with us by leaving your link? Just click on the Mr. Linky image below!

Monday, June 29, 2009

Mason Jar Peach Cobbler


I made this over the weekend for our local Heritage Days Festival. It was a huge hit and I'm sure it will be with your bunch too! I adapted this recipe from Paula Deen-she's my hero!!!

Ingredients
2 cans sliced peaches drained
1 cup sugar
1 1/2 cups self rising flour
1 tsp cinnamon
8 tbs butter
1/1/2 cups milk

Directions
Preheat oven to 350. Drop 3/4 tsp of butter in 12 half pint mason jars. Place jars in a large casserole or broiler pan to help keep them stable. Place pan of jars in oven to melt butter. Cut drained peaches in large chunks and set aside. Mix dry ingredients with milk till smooth. Spoon 1/3 cup batter into each jar. Evenly divide any left over batter among the jars till all the batter is used. Spoon 1/4 cup of peaches on top of batter. Bake jars 25 minutes or until to>ps are slightly brown. Dust with cinnamon sugar mixture is desired. Carefully screw lids and seals on immediately after removing from oven for self sealing jars.
Makes approximately 12 half pint jar servings.
Sealed items can be stored at room temperature or in the refrigerator. Jars can be kept for several days up to a week. Do not eat if item's color has changed or there are any visible signs of mold.


Tips and hints
Virtually anything can be baked and sealed in a jar. The trick is to fill the jar 1/3 of the way full for any rising breads or cakes to allow enough head room after baking. Quickly and carefully screw lids with seals onto the jars. As the sealed jar cools the lids will self seal. Remove the lids and seals to heat either in the microwave or oven. Serving food in a jar is perfect for picnics or family reunions.


Friday, June 26, 2009

Basic Canning Equipment

I originally posted this last year, but thought it would be helpful to post again for those who are new to preserving. For those of you who are new to preserving, feel free to ask any questions. I will do my best to answer. For those of you who are experienced canners, feel free to leave a comment about your favorite canning gadget, or canning tip.

Where I live a backyard garden is a common thing, but even here, I've noticed many new gardens go in this spring. Many existing gardens have also been expanded. Pressed by rising fuel prices and the rising food prices that are following, people are stretching their grocery dollars by raising some of their own food.

My garden is just starting to produce, and soon it will be time to break out the canning equipment to put away some of that harvest for the winter. I know many of you have expressed an interest in canning. I am no expert. The real experts are the folks at the USDA, but I am happy to try and help. Let's start with the basics.

There are three very basic items you need to begin canning. You need jars with sealing lids, a large pot for processing, and canning tables that tell you how long to process the jars.

Jars with Sealing Lids
You can find jars in a variety of sizes. The most common used are quart and pint jars. I find quart jars to be the most useful for my large family. I use pint jars mostly for hot peppers and pickles, though it is nice to have some pints of tomato sauce too.

Jars also come in wide mouth or regular. In my opinion, wide mouth are much easier to work with. They also are easier to clean, but they are more expensive.

Some people use recycled jars from spaghetti sauce or other items they have purchased at the store. I personally do not do this, and it is not recommended by the experts. I believe the logic behind this is that Mason jars are made to last the stresses of canning repeatedly. Jars used in the food industry may or may not be made as strong. Yet, I know people do can with them.

The most common type of lid is actually a two part lid. It is a lid with a ring. You have to buy new lids every year, but the rings can be used over and over. They are easy to use. There are other types of sealing systems using reusable rubber rings. I've never canned with those before, so I can't offer too much information on those.

Processing Pot
When you are canning there are two ways to process the jars. You can simply cover them with boiling water and boil for the recommended amount of time. The other way is to use a pressure canner. It is not recommended that low acid foods, like beans, be processed using the boiling water method. All foods can be canned in a pressure canner. I use both methods.

When canning with boiling water any heavy pot that is large enough to fill with enough water to cover your jars can be used. A water bath canner with a rack is much more convenient to use. They really aren't very expensive. I think a canner is a worthwhile purchase if you are planning to do a lot of canning that can be done without pressure canning.

Canning Tables
You need a resource to consult for how long to process your jars. If you buy a new canner, chances are there will be instructions with timing tables included. One of my older cookbooks also has tables. There are whole cookbooks devoted to canning. The most famous is probably the Ball Blue Book. Though a canning cookbook isn't necessary, it is nice to have as a resource. Besides basic instruction and time tables, it gives you recipes for different items. It can help when you are at a loss for what to do with the excess your garden is producing. Of course all canning tables are created based on the guidelines put out by the USDA. Their advice is available for free online.

These are the bare basics of equipment you need to begin canning. There are lots of tools and gadgets designed to make things easier. Before you run out and buy any equipment and gadgets, check around for used supplies. There are lots of people with shelves and boxes full of jars that they don't ever plan to use. Let family member know you are looking for canning equipment. Check on Cragislist. Ask on Freecycle. Look at yard sales. You may find all you need for free or a fraction of the cost of new.

I hope that was helpful for those who are new to canning. If you have any questions, I'd be happy to help if I can.

Friday, June 19, 2009

Blackberry Freezer Jam

My seven year old daughter is becoming the family berry picker. Everyday she goes out to the patch of black raspberries to check and pick. So far, she is only getting a couple cups at a time, but soon the blackberries will be ripe and picking will become a family job.


I'm not complaining. I enjoy going out to pick. Often I will get up before the kids and sneak out to the berry batches to pick in the early morning peace and quiet. It is good for my soul. And the resulting berries are good for my taste buds.

One of my favorite ways to preserve that fresh berry goodness is with freezer jam. It is faster to prepare, and keeps more of the fresh taste than cooked jam. It does set softer, and of course requires space in the freezer. The recipe is in the Sure-Jell box.

3 pints blackberries (6 cups)
5 1/4 C sugar
1 box Sure-Jell

Mash berries with a potato masher one cup at a time. Add sugar to crushed fruit. Stir and allow to sit for ten minutes. Put pectin and 3/4 C water into a sauce pan. Bring to a boil stirring constantly. Boil for one minute. Add mixture to berries and stir for about three minutes until sugar is dissolved. Pour into containers. Allow to sit at room temperature for 24 hours. Keeps in the refrigerator for about three weeks or up to a year in the freezer.

I don't have many freezer boxes. I freeze most things in bags. Trust me, bags are not the way to freeze freezer jam. What a mess! Instead I used recycled food containers like cottage cheese containers. Works wonderfully. Just be sure to label your container!

Header designed by Crystal. Thanks!