Saturday, February 28, 2009

Celebrate Spring!

Spring isn't quiiite here in my part of the U.S., but it's on it's way. About every two weeks, we get a little taste of warmer temps and sunny days before Mother Nature pulls the rug out from under us and we drop into the single digits again. Suffice it to say that in our area, you keep the winter coats handy well into April.


In honor of the "spring teasing" we've been getting, today's craft is a fun one for the little ones- a cute melting snowman to warm your home.


MATERIALS NEEDED:
White felt
Large White pom pom
White glue
Black dimensional fabric paint
Small twigs
Fabric or felt scrap for scarf
Scissors
Small sliver of orange foam, felt or fabric (fabric paint will also do)


Step 1: Cut a large, wavy puddle shape out of the white felt.

Step 2: Cut a wavy v-shape out of the scarf fabric and cut fringe into the ends of it. Glue onto the puddle shape.

Step 3: Glue the twigs in place on top of the scarf and glue the pom pom on top of the twigs. Hold for at least 30 seconds to allow glue to set up and keep pom pom from rolling off.

Step 4: Glue or paint orange onto the pom pom for the nose.

Step 5: Using black dimensional paint, make dots for the eyes and mouth on the pom pom; make dots for buttons on the white felt.

Step 6: Allow glue and paint to dry for 24 hours.

Heather is a wife, mom,
school cafeteria worker,
councilwoman and babysitter from Ohio.
She also blogs at
Heather LessiterIts All for the Best
and
The Fat Bottomed Girl.

Friday, February 27, 2009

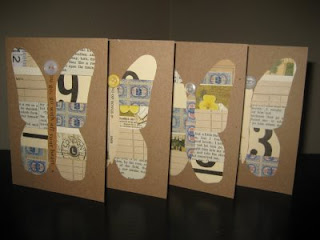
Handmade Cards From the Heart


I am all about recycling over on my Greenhab blog, so I am recycling a post today! My apologies -- and promises for a great project next week -- but I've been taking care of a sick little one this week and haven't had much time for other fun projects.

Since I'm approaching my one year anniversary of not buying greeting cards, I thought I'd share this tutorial for making a cute patchwork card.

I made these using plain brown cards from Hobby Lobby and several upcycled pieces of paper - a flashcard, a page from a very old bible I found in the trash at a yard sale, a page of grocery stamps that were used years and years ago, and several other old-timey things. We're going to make a set of 6 cards, so we'll need 6 different pieces of paper.

I decided to make a butterfly for these cards, but you can use any shape you'd like. I simply googled "butterfly clipart", adjusted the size in Photoshop Elements, then traced it onto a piece of paper. Cut our your pattern, then trace it onto the back of the pieces of paper you're using. Cut them out and make sure that they're all the same size.


Stack them on top of each other, then cut up the middle. Hold on to the tightly because they try to move around a bit. Set the right side apart, we'll work with the left wings first.


Now for the tricky part. It's actually easy - just hard to explain. You want a patchwork look, so you'll make your first cut across the top and set that pile down. After that first cut, you're going to "shuffle" the rest of the pieces by putting the top piece on the bottom of the deck. Cut your second strip and set it down. Take the top piece of the remaining deck and put in on the bottom.
Repeat until you have cut the wings into 6 sections.
Then pick up the right wings. Before cutting, put the top piece onto the bottom. Make your first cut and put that pile aside. With the stack still in your hand, take the top piece and put it onto the bottom. Cut your second section, shuffle again. Repeat until you have 6 sections of right wings.

Your piles should now look something like this:


Now it's time to put Humpty Dumpty back together again. I used some glue dots I already had for scrap booking. They're the kind that roll on and they worked beautifully, but a spray adhesive might also be a good choice. Basically you just take the top layer from each pile and glue them onto the card. If your cuts, like mine, were not exactly perfect, then Madame Butterfly might look something like this. Make sure as you're gluing the pieces on the card that the outside edges match up. Don't worry about the middle quite as much because we're going to cover that up. Here's what you'll have now:


Then use some scrap pieces to cut out an oblong body for the butterfly. I also glued a little button head on her because I think everything is cuter with buttons!


~*Kellie blogs regularly at Greenhab: The Browns Go Green*~

Upcoming Carnivals


Can you believe February is almost over?! The good news is that means it is almost time for Firsts on the First! I will be sharing our first attempt at homemade tortillas. What new things have you tried this month? Be sure to link them up on my post Sunday. 

Next week MIFS will be hosting a different carnival, The Homesteading Carnival. Be sure to submit your posts by Sunday to be included in Monday's carnival. 

Then on Tuesday of course, it is Make it from Scratch. This week hosted by my husband, Applehead

So many good things coming up this week! I can't wait! 

Thursday, February 26, 2009

Eating Out Cheap?

I love to go out to eat. What is not to love? Someone else does all the shopping, the cooking, and most importantly, the clean up for the family meal.


I will tell you what is not to love, the price. Even cheap dining out is costly compared to the alternatives. 

With a family of six, where the children are quickly aging out of the free meal brackets, eating out cheap is practically an oxymoron. In fact, the last time the entire family went out to eat we ate at Cici's. It cost us about $25, even though we used a coupon and only drank water. $25 dollars may not seem like all that much, but let's compare it to the alternatives. 

One alternative to going out for dinner is to buy ready made food at the grocery store. Instead of going out for pizza, ready made pizzas could be purchased.  Aldi  has ready to bake (not frozen) pepperoni or cheese pizzas for $6.89. I'm not sure the exact size of these pizzas, but they are very large. They are bigger than my baking stones. Two of these will feed my family, and usually leave a few leftovers. Less than $14 to feed the family is cheaper than going out, and there is usually enough for my husband's lunch the next day. Not bad, but we can do better.

The next alternative is to make your meal at home. Keeping with the pizza example, let's look at the cost of  homemade pizza. Pizza is pretty easy to make. Dough can be made in the bread machine, and pizza crusts can be made ahead of time and frozen. My favorite dough recipe is mixed by hand. 

Pizza Dough

An easy an delicious start to homemade pizza.

See Pizza Dough on Key Ingredient.


I normally double the above recipe, and make two thick crust pizzas on my baking stones. 

We make our pizzas with all kinds of different toppings, but for comparison, let's price out a single topping; pepperoni. 

Crust
flour $0.52
oil          .10
yeast     .07
sugar  negligible
salt      negligible

Toppings
tomato paste  $0.39
spices                 negligible
cheese                3.29
pepperoni          1.00

Total cost = $ 5.37
Of course you have some time invested, and a little electricity, but the savings is huge! 

Reviewing the numbers for feeding a family of six pizza: Cici's - about $25. Buying ready made pizzas - about $14. Making it from scratch - less than $6. 

Personally, we are trying to tighten our budget.  If we are eating out on a regular basis,  we are fooling ourselves if we think we can do it cheaply.  Going out to eat must be reserved for special occasions. It is nice, but it sure isn't cheap. 


Tuesday, February 24, 2009

Carnival #104

Mary presents our carnival this week at SimplyForties. This edition is full of easy and fun crafts, and delicious recipes. Be sure to head over to check the entire carnival for yourself, but here are a few posts to whet your whistle:


Though this particular post is slanted toward Valentines Day, the ideas could easily be applied for other occasions such as an anniversary, birthday, or just to show a little love. These suggestions create very personal, yet frugal gifts.

I love this concept of mixing your own spices instead of buying ready mixed. It is less expensive, and you can adjust the spice to suit your family's taste. A few spice mix recipes are included. 

These look fabulous, and can be made ahead. Perfect for ready to go breakfasts, company, or for a brunch party. 

Be sure to thank our hostess with your comments, link love, and social bookmarks. We are always looking for more hosts. Send me an email to get on the schedule! 


Some other carnivals you may enjoy:

Monday, February 23, 2009

Fabulous

Thank you to Kim at Sacred Heart of Jesus for awarding Make it from Scratch the Your Blog is Fabulous Award. 


First, as part of this award,  I must confess five things that I'm addicted to.

1) Coffee.
Must have it every morning.

2) The computer.
Again, must have it, every morning. 

3) Trying new things.
I love trying something new. Speaking of trying something new, Firsts on the First will soon be here. What new things have you tried this month? Won't you share them with us on the first?

4) Raising animals.
We basically have a petting zoo here. Though it is certainly work, it is the most fun work on my ever growing list of responsibilities. We've had lots of new babies recently, and that is always exciting. 

5) Gardening
Winter is a hard time for a garden addict. I've eased the withdrawals some by pouring over seed catalogs and starting some seeds indoors, but where oh where is spring?! I'm suffering here! 

Now, I have the privilege to pass this award on to five other Fabulous blogs. 


Be sure to stop by and check these fabulous blogs! 

Sunday, February 22, 2009

Modeling Compound Catch-All

Last month, I posted about our Modeling Compound Magnets. If you liked that craft, you'll love the catch-all that Steven made with the same compound!


Steven is 6 and he loves to make gifts for people. I love it when he makes useful gifts for people. Not to say that I don't love everything he makes, but when it is a useful something, I love it even more.


Materials
Air-dry Modeling Compound
Scissors (optional)
Markers and/or Paint (optional)
IMAGINATION!


Form the modeling compound into a bowl or tray shape. Steven then used scissors to cut around the edges for a decorative effect. Let the bowl dry completely (overnight is best). Paint or color with markers and allow to dry completely.

Use your catch-all for coins and other pocket contents at the end of the day. I use mine to hold two lipsticks on my dresser. This would also be nice to keep rings, barrettes or hair pins (does anyone besides me still use these?) corralled. What else can you think of?

This would be a wonderful craft for Mother's Day, Father's Day or for a Grandparent's birthday!
Heather is a wife, mom,
school cafeteria worker,
councilwoman and babysitter from Ohio.
She also blogs at Heather LessiterIts All for the Best
and The Fat Bottomed Girl.

Friday, February 20, 2009

Fresh & Clean Laundry Soap

I've been making my own cleaning products for some time now and love the way that so many different types of cleaners can be made from 6 basic ingredients: baking soda, washing soda, borax, castile soap, vinegar, and lemon juice. I make glass cleaner, an all purpose spray cleaner, soap for the wood floors, scrub for the bath tub, soap for the dishwasher, and even shampoo out of these ingredients.

Recently I decided to test out some homemade laundry soap. I've been using Charlie's Soap, which I completely love, but I can no longer get locally, so I decided to look to my current products for an answer. I was already using washing soda and/or Borax in addition to my regular laundry soap sometimes when I needed a laundry booster or something for odors or tough stains. And my Dr. Bronners castile soap touts that it can be used to clean just about anything. So why not mix them up?
I ended up grating an ounce of the Dr. Bronner's, then adding a cup of Borax and a cup of Washing Soda. I shook it all together and stored it in a glass jar w/ tight fitting lid. I use about 2 tablespoons for each load (just because that's how big the scoop is in my laundry room).


Our laundry comes out looking, feeling and smelling nice and clean. No fake "mountain fresh" or "sunshine" scent, just clean. There's no plastic waste. Everything comes in cardboard, which I recycle. And it's all stuff that I buy anyway. Gotta love that!

EDITED 2/27/09 to say: As you'll see in the comments below, we were asked for a cost per load on this laundry soap. We originally figured it at a much higher price (because I'm not all that good at math, evidently!). I looked online for prices of the Washing Soda and Borax because I didn't remember how much I'd paid for them 6+ months prior. Well, when I went to our local King Soopers grocery store (owned by Kroger) to restock this week, I found that they were much cheaper than I found them online. So here is my new cost breakdown:

COSTS:
Washing Soda: 3.99 for 55 oz = .072 / oz
Borax: 3.49 for 76 oz = .045 / oz
Dr. Bronner's bar: 3.65 for 5 oz = .73 / oz

For one batch I use:
8 oz Washing soda = .576
8 oz Borax = .36
1 oz Dr. Bronners = .73
for a total cost of = 1.66 per batch

One batch = 17 oz of mixed product
2 tbsp = 1 oz, so there are 34 tbsp of product in this batch
$1.66 divided by 34 tbsp = .048 per tbsp

I use 2 tbsp per load, so that is $0.097 (let's round up to $.10) per load

Hope that helps!


~*Kellie blogs regularly at Greenhab: The Browns Go Green*~

Thursday, February 19, 2009

Do It Yourself Microwave Popcorn

Crunchy, buttery, salty, who doesn't love popcorn? 


Popcorn is a pantry staple in this house. For a long time, it came in the form of prepackaged bags ready for the microwave. While I certainly enjoy that kind of popcorn, the flavoring can tend to be a tad heavy, and leave an after taste in your mouth. 

I prefer air popped popcorn with a touch of real melted butter (or buttah as Kellie might say,) and a sprinkling of salt, but not everyone has an air popper. No worries, you are not doomed to prepackaged microwave popcorn. Simply make your own microwave popcorn. 

Take a small paper bag and put in 1/3 cup of popcorn. Fold the bag down a few times. It can be secured with a staple, but we usually just fold the bag. Now, microwave it. It takes about 2 minutes in our microwave, but you'll want to keep an eye on your bag the first few times you try this to determine the correct time for your microwave.  (I've also been told this will work in a bowl, but I've yet to try it.) Add melted butter and salt, or other flavorings you enjoy. 

Making your own microwave popcorn is better in so many ways:

Taste: No chemical after taste. 
Health: You control the amount of fat and salt. 
Environment: Less packaging. Less waste. 
Budget: Bulk popcorn is less expensive than "microwave" popcorn. 

Now go and enjoy that crunchy, buttery, and salty taste!

image credit: Darren Hester

Tuesday, February 17, 2009

Carnival #103

This week the Make it from Scratch carnival can be found at 11th Heaven's Homemaking Haven.  Mom2My9 has put together an excellent carnival full of photos. Be sure to thank her with your comments, link love, and Stumbles


So many good entries this week! Here are a few that I particularly enjoyed:

This is a great tutorial on making your own mixes for the bread machine. It includes recipes, tips, and menu ideas!

I love this soup at the Olive Garden. Can't wait to try it at home! 

Healthy hair using eggs! Very interesting!

Enjoy the carnival this week! You may also enjoy the Carnival of the Recipes.

Saturday, February 14, 2009

Glubber

It's the time of year that the cabin fever starts to set in. Winter has been around all too long and the kids have been cooped up just enough to make you want to pull your hair out one thin strand at a time. This is when moms dust off their desperation creativity and search the internet ol' brain for something to get the kids out of their hair squealing with glee.

Ahem.

What you need is a quick and easy concoction the kids will LOVE that can be whipped up with simple ingredients that you might have around the house.

Enter Glubber, the rubbery, bouncy, slimy-feeling glop that will literally take minutes to make and keep kids happy for hours.

Glubber
1 Tablespoon Borax
1/4 Cup White Glue
1/4 Cup water

Pour 1/4 Cup water in a plastic cup; add Borax and stir for 2 minutes until water is saturated (you will still have some borax in the bottom of the cup). Pour glue into a zip-top bag. Pour the liquid from the Borax mixture into the bag, zip bag closed and squeeze bag until a soft mass forms in the liquid (about 30 seconds). Run tap water in the bag for about 10 seconds to rinse the glubber off. Remove it from the bag and play away (try bouncing it!). Store in an airtight bag.

I have never tried coloring the glubber, but I would think you could add a tiny bit of food coloring to the glue to give your glubber a tint. If you try that, let me know.


Heather is a wife, mom,
school cafeteria worker,
councilwoman and babysitter from Ohio.
She also blogs at
Heather LessiterIts All for the Best
and
The Fat Bottomed Girl.

Friday, February 13, 2009

Sweet Treats for your Sweet Pea!


One of the nice things about having a three year old is that you can pull just about anything out of the freezer and say it's ice cream. I wonder when he'll wise up to that? Today while he was at school, I made these yummy little "ice cream" treats. They were so easy that a blow-by-blow is really not necessary, but the whole project made me happy, so I thought I'd share.


First, meet Oskar. He's been in our family since the 1970's. You know, back before planned obsolescence when they made things to last a lifetime? My mom made my baby food in it and I used it to make my son's as well. When the day comes that I have to chuck this baby into the landfill, I won't feel all that bad about it, because Oskar has lived a long and helpful life.


These I found for $0.49 each at Goodwill. I want to make crayons as party favors for my son's birthday this summer. I thought I'd have to search the thrift stores for ages something like this, but I was pleasantly surprised to find them dirt cheap on my first trip. The two in the front are from Ikea and feel like those silpat (?) cooking mats. The one in the back seems to be an ice cube tray. I was looking at the metal versions on ebay (since I'm avoiding plastic) but they cost a lot more than $0.49. And since there is no new manufacturing impact here, I was very pleased to rescue them!


And these are the contents of my fridge. Please don't ask me where I buy fruit locally in the middle of winter in Colorado. Because I don't. But let's not talk about that. It's on my "things to work on list" for 2009.


So everything gets dumped into Oskar and chopped up. I was planning to add yogurt, but ran out of it, so I added a bit of milk instead.


Spoon it into the ice cube trays and freeze.


Isn't that better than the store-bought stuff? No high fructose corn syrup, no additives, dyes, or other things you can't pronounce. A little creativity and an old friend go a long way!


~* Kellie blogs regularly at Greenhab: The Browns go Green *~

Thursday, February 12, 2009

Hi everyone

Stephanie wanted me to let every one know that we do not have any power at the house (again.) So she was unable to post today's post. Keep your eye out, she is bound to make an appearance here soon.

Tim

Tuesday, February 10, 2009

Carnival #102

This week Mama Bear has another wonderful carnival for us to enjoy! Be sure to see the complete carnival at I've Got a Little Space to Fill. We are in need of more hosts. Please email makeitfromscratch at yahoo.com to be added to the schedule!

Here a few submissions that I found particularly interesting from this week's carnival:

I've had a similar project brewing in my head. This gives me another idea for how to make it work. Perhaps you will see it here some first of the month

Mary never fails to give us a fantastic recipe for the carnival. This one hits on two of my favorite ingredients. It looks fabulous! 

Perhaps at the opposite end of the spectrum, but chocolate and peanut may be my favorite combination of flavors! This dessert will be on the to try list at this house! 


Enjoy the carnival!

Other items of interest:
Festival of Frugality
The Homesteader's Carnival
Foods Naturally


Apologies for my tardiness in posting this. It has been a crazy day! 

Saturday, February 7, 2009

Quick and Easy Handmade Burp Cloths

One thing you can never have enough of with a baby in the house is burp cloths. They serve as an all-purpose napkin/hankie/washcloth/bib and you go through them quickly. A co-worker of mine recently became a dad and I thought these burp cloths that I saw at Rocks in My Dryer would be the prefect gift.

Shannon made hers with two coordinating fabrics, but the choices were limited at my fabric store and I LOVED the one I found so much that I just bought two yards of it. If you find two that coordinate, you'll need one yard of each. You'll get around 6 cloths out of two yards and it took me a couple of hours to make mine, but that includes several interruptions by the kiddos.

MATERIALS NEEDED
2 yards of flannel
Thread to match
Pinking shears or scissors
Pins

Step 1: Wash, dry and iron your fabric. This is important because the fabric will shrink and shift and you want it to do this before you sew.

Step 2: Make a pattern out of an 11 X 17 inch piece of paper (or tape 2 sheets of 8.5 X 11 together along the 11 inch sides). Use a cup or glass to trace a rounded edge in each corner and cut the corners out.

Step 3: Place your fabric right-sides (printed sides) together; trace your pattern on the back of the fabric laying the edges as close to each other as possible.

Step 4: Cut the fabric pieces out (use pinking shears if you have them) keeping the two pieces together.

Step 5: Pin the pieces together in various places around the edges. (You all know I'm a rebel and don't like to use pins, so pretend I followed my own directions. K?)

Step 6: Using slightly more than a 1/4 inch seam allowance, start stitching about half-way down one of the long sides of the cloth. Sew all the way around the edges leaving a 4 to 5-inch opening on the side.

Step 7: Reach inside the opening and turn the piece right-side out. Push out the corners and iron the entire piece to make the edges nice and neat and easier to sew.

Step 8: Using LESS THAN a 1/4 inch seam allowance, stitch all the way around the edge of the cloth. The smaller seam allowance will sew the opening closed and will go right through the original seam allowance giving some stability to the cloth. Make sure you back stitch.

Step 9: Trim your threads and you're done!!!

Heather is a wife, mom,
school cafeteria worker,
councilwoman and babysitter from Ohio.
She also blogs at Heather LessiterIts All for the Best
and The Fat Bottomed Girl.

Friday, February 6, 2009

It's like buttah!

I love making homemade butter because it's incredibly easy, yet it always seems to amaze people. Not to mention you control what goes into it, so there's never any additives or preservatives or anything partially hydrogenated.

To get started you'll need some heavy whipping cream, a jar and something to put the butter in. My kind of prep work! I use an old spaghetti sauce jar and, yes, that's actually a sugar bowl...but it does just fine as a butter dish for the fridge too.

Let the cream sit out for a half hour or so before you begin to let it warm up a bit. Fill the jar about a third to half way full, put the lid on tightly and start shaking! I've filled the jar too high several times and had to pour some out because it expands as you shake it. After a few minutes the sides of the jar will be white with a nice thick whipped cream. Taste it if you'd like!


Keep shake, shake, shaking and you'll notice it become thick with the slightest yellow tint to it. If you open the jar now it may look more like mayonnaise. Another minute or two and you'll see it start to separate from the sides of the jar, then eventually clump together at the bottom. It will look a tiny bit like cottage cheese, but smoother.


Just another few shakes and the thick parts will stick together and separate from the buttermilk. At this point, you'll want to open the jar and pour off the buttermilk that has separated.


I usually shake a few more time and repeat pouring off any extra buttermilk. Then pour the butter into a bowl. It should slide right out.


There you have butter! (And a good arm workout as well!) When I remember, I add a dash of salt somewhere in the middle of this process. I bet you could add some freshly chopped chives or other herbs. That would be delicious on warm bread fresh from the oven.

Go home and amaze your loved ones tonight!

Kellie blogs regularly at Greenhab: The Browns Go Green.

Thursday, February 5, 2009

Cutting your Food Costs

Seems everyone these days is looking for ways to trim the budget. Food expense is often an area of the budget with a lot of fat. Below are some suggestions that may help you trim it down.


1. Cook from scratch.
C'mon you knew that was coming. This is Make it from Scratch after all. Starting with basic ingredients, instead of ready made items, for your family's meals is not only good for your health it is also good for your budget. 

Consider the items you normally use a mix for, or purchase ready made. Once a week or so try to make one of them from scratch. You'll find that many of them are almost as easy to make from scratch as they are to make from a mix. Share what you try right here for Firsts on the First

2. Use less meat.
If you already cook most of your family's meals, you can trim your grocery budget even further by using less meat. Stretch your meat by using it in soups, casseroles and stir fry instead of serving it as a stand alone dish. Serve a vegetarian meal or two every week. You may be surprised how much your family loves the very economical dried beans. 

3. Pack your lunches.
If you or your spouse work, if the kids go to school, packing lunches can save a huge amount of money. A five dollar lunch picked up at a drive through may not seems like a big deal, but think of how many meals for the whole family you could buy with that same money. How much does a box of spaghetti and a jar of sauce cost? Or how many bags of beans would $5 buy. Eating out adds up quickly. 

4. Eat your leftovers. 
Throwing away leftovers is simply throwing away cash. Use your leftovers for lunch the next day. Save all the leftovers for one night and call it a buffet. Let everyone pick out what they would like to eat for dinner that night. Get creative and make new things from your leftovers. 

5. Stick to a shopping schedule. 
Those "quick trips" to the grocery store to get "just one item" often become a cart full of groceries you hadn't planned on buying. Keep a running list of items you are running low on so you can stock up on your next shopping trip. If you are out of an ingredient, try to find a substitute or make do with out it. 

6. Keep it basic and simple.
Elaborate recipes, or high priced ingredients may be fun and tasty, but they are not necessary to meet your family's needs. Simple and basic does not mean tasteless, either. Some of the most simple and economical meals are family comfort food favorites. 


Food is a necessity, but spending a fortune to meet that need is not. What are your favorites tips and tricks to help keep food costs down? 

Tuesday, February 3, 2009

Carnival #101

This week our carnival can be found at Greenhab: One family's journey to green up their lives. This is the home blog of Kellie, one of the MIFS contributors. Thanks Kellie for a wonderful carnival!


Be sure to head over there for the entire carnival, but here are a few that I found particularly interesting:

This is a project by RecycleCindy. I love all of Cindy's projects, but most of them are out of my skill set since they involve crocheting. This one is different. Incredibly cute, and something even I could make!

Love these ideas for re-purposing items for nest boxes. If you raise chickens in the city or the country, there is no need to spend a lot of money to keep your hens happy. 

The cheese crust sold me on this post. Though, I have to admit, I have no idea what kind of cheese that is in the recipe! Of course, the using what you have, and making a large quantity at once were also great features to this post.


Would you like to host a carnival or contribute to this blog? It is easy. Just email makeitfromscratch (at) yahoo.com for details!

Of other interest around the blog world:

You don't have to consider yourself a homesteader to enjoy this carnival. This carnival is full of recipes, crafts, and other do it yourself ideas. 

This is a shameless plug for a guest post I wrote for Scribbit

Sunday, February 1, 2009

Firsts on the First - Making a Map Cake

Welcome to the February edition of Firsts on the First. This is a monthly feature where I share something I've tried to make for the very first time, fail or succeed. Last month I tried Coffee Liqueur. This month the kids and I made a map cake. 


We've been studying ancient history this year using Mystery of History Vol 1 as a beginning text. After every three lessons there is a time line and map activity. After a series of lessons about Egypt, the map activity was somewhat different than any map I have ever made before. It was a map made from a cake. 

Start with a yellow sheet cake. We used the simplest recipe I could find in the Settlement Cookbook, but of course, you could use a mix. Then we mixed up a simple butter frosting. About 2/3 of the frosting was colored orange. The other third was made blue. 

Turning the cake long ways, we scraped out a bit of the cake at the top of the pan where the Mediterranean Ocean would be on the map. Then, using the back of a knife, a groove was made for the Nile River. Both of these were frosted in blue. The rest of the cake was frosted with orange. (Pardon my out of season table cloth!)

Next, flags were made for the places we learned about by simply cutting a square of card stock, writing the location on it, and taping it to a toothpick. Then the flags were placed in their appropriate positions. Chocolate kisses were used to represent mountains (I think the kids got a tad bit carried away with the mountains,) and chocolate chips became pyramids. A map cake of Ancient Egypt:

This was a fun and fairly easy project, not to mention the most delicious map ever. The kids had a lot of fun making (and eating) it. Wish I had known about this lesson plan when I was teaching. My middle school students would have loved it!

Did you try anything new last month? Share it with us by adding the link to your post below! (It is perfectly acceptable to link to posts that have also been included in the carnival.) 


Header designed by Crystal. Thanks!